How to Build a Raycasting Engine
Doom shipped in 1993 and ran on a 486. It wasn't real 3D — it was a trick called raycasting. For every column of pixels on screen, you fire a ray into the world and measure how far it goes before hitting a wall. Close walls get tall strips. Far walls get short ones. Your brain fills in the rest.
The engine's 128x128 pixel buffer is a fun place to try this. There's no 3D API to lean on — just pset, some trig, and a flat array of colors. By the end we'll have a navigable, textured 3D dungeon with distance shading, built from nothing.
The Map
Every raycaster starts with a grid. Each cell is wall or empty space. We'll use an 8x8 array where 1 means wall and 0 means floor.
The player's position is a pair of floats in map space. 1.5, 1.5 puts them in the center of cell [1][1].
Let's draw it as a top-down minimap:
// the map: 1 = wall, 0 = empty
const map = [
    [1, 1, 1, 1, 1, 1, 1, 1],
    [1, 0, 0, 0, 0, 0, 0, 1],
    [1, 0, 1, 0, 0, 1, 0, 1],
    [1, 0, 0, 0, 0, 0, 0, 1],
    [1, 0, 0, 0, 0, 0, 0, 1],
    [1, 0, 1, 0, 0, 1, 0, 1],
    [1, 0, 0, 0, 0, 0, 0, 1],
    [1, 1, 1, 1, 1, 1, 1, 1],
];

// player position in map space (floats)
let px = 1.5;
let py = 1.5;

// inside draw()
const cell = 16; // 128 / 8 = 16 pixels per cell

for (let y = 0; y < 8; y++) {
    for (let x = 0; x < 8; x++) {
        const color = map[y][x] === 1 ? 5 : 6;
        rectfill(x * cell, y * cell, (x + 1) * cell, (y + 1) * cell, color);
    }
}

// draw the player dot
rectfill(
    Math.floor(px * cell) - 1,
    Math.floor(py * cell) - 1,
    Math.floor(px * cell) + 2,
    Math.floor(py * cell) + 2,
    8,
);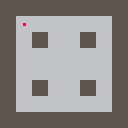
Each cell draws as a 16x16 pixel block — 8 cells times 16 pixels fills the 128-pixel screen exactly. The player shows up as a small red square. This minimap sticks around for the rest of the tutorial. It's a great debugging tool.
Casting Rays
Now for the fun part. We're going to fire one ray per screen column, sweeping across the player's field of view. Each ray marches through the grid until it hits a wall.
The algorithm is called DDA — Digital Differential Analysis. The idea is simple: a ray crosses grid lines in two directions (horizontal and vertical). We figure out which crossing comes first, step there, check for a wall, and repeat.
The key variables are deltaDistX and deltaDistY (how far the ray travels between grid crossings in each axis) and sideDistX and sideDistY (how far to the next crossing). At each step we advance whichever is smaller.
When we hit a wall, we also record which face the ray struck — an X-face (vertical wall) or a Y-face (horizontal wall). This matters later for texturing.
let pa = 0; // player angle in radians
const fov = 0.66; // camera plane length (~66 degree FOV)

// inside update()
if (btn('ArrowLeft')) pa -= 0.05;
if (btn('ArrowRight')) pa += 0.05;

// inside draw() — after drawing the minimap
const dirX = Math.cos(pa);
const dirY = Math.sin(pa);
const planeX = -dirY * fov;
const planeY = dirX * fov;

for (let x = 0; x < 128; x++) {
    const cameraX = (2 * x) / 128 - 1;
    const rdx = dirX + planeX * cameraX;
    const rdy = dirY + planeY * cameraX;

    let mapX = Math.floor(px);
    let mapY = Math.floor(py);

    const deltaDistX = Math.abs(rdx) < 1e-10 ? 1e30 : Math.abs(1 / rdx);
    const deltaDistY = Math.abs(rdy) < 1e-10 ? 1e30 : Math.abs(1 / rdy);

    let stepX, stepY, sideDistX, sideDistY;

    if (rdx < 0) {
        stepX = -1;
        sideDistX = (px - mapX) * deltaDistX;
    } else {
        stepX = 1;
        sideDistX = (mapX + 1 - px) * deltaDistX;
    }

    if (rdy < 0) {
        stepY = -1;
        sideDistY = (py - mapY) * deltaDistY;
    } else {
        stepY = 1;
        sideDistY = (mapY + 1 - py) * deltaDistY;
    }

    let side;

    while (true) {
        if (sideDistX < sideDistY) {
            sideDistX += deltaDistX;
            mapX += stepX;
            side = 0;
        } else {
            sideDistY += deltaDistY;
            mapY += stepY;
            side = 1;
        }
        if (map[mapY]?.[mapX] === 1) break;
    }

    const perpDist =
        side === 0 ? sideDistX - deltaDistX : sideDistY - deltaDistY;

    // draw the ray on the minimap
    const hitX = px + rdx * perpDist;
    const hitY = py + rdy * perpDist;
    line(
        Math.floor(px * cell),
        Math.floor(py * cell),
        Math.floor(hitX * cell),
        Math.floor(hitY * cell),
        10,
    );
}
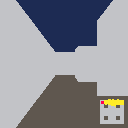
The ray fan shows exactly what the player can "see" from their current angle. Notice how the rays wrap around corners and stop cleanly at wall edges — that's DDA doing its thing.
Why perpendicular distance? If you use the straight-line (Euclidean) distance from the player to the wall, rays at the edges of the screen will report longer distances than the ray in the center, even for a flat wall. This produces a fish-eye effect. Perpendicular distance — the component of the distance that's perpendicular to the camera plane — corrects for this.
Drawing Walls
We've got ray distances. Now we can project walls. The formula is one line: stripeHeight = viewHeight / perpDist. A wall one unit away fills the entire view. Two units away fills half. And so on.
Let's split the screen: a small minimap on the left (32 pixels) and the 3D view on the right (96 pixels). The ceiling gets a solid dark navy fill, the floor dark grey:
// inside draw() — split-screen layout
const cell = 4; // minimap: 4px per cell (fits in 32px)
const viewX = 32; // 3D view starts at column 32
const viewW = 96; // 3D view is 96 pixels wide
const viewH = 128;

// draw minimap (left 32 columns)
for (let y = 0; y < 8; y++) {
    for (let x = 0; x < 8; x++) {
        const color = map[y][x] === 1 ? 5 : 6;
        rectfill(x * cell, y * cell, (x + 1) * cell, (y + 1) * cell, color);
    }
}

// draw ceiling and floor
rectfill(viewX, 0, viewX + viewW, viewH / 2, 1);
rectfill(viewX, viewH / 2, viewX + viewW, viewH, 5);

// cast rays — one per 3D view column
for (let x = 0; x < viewW; x++) {
    const cameraX = (2 * x) / viewW - 1;
    // ... DDA raycasting from previous section ...

    const stripeH = Math.floor(viewH / perpDist);
    const drawStart = Math.max(0, Math.floor(viewH / 2 - stripeH / 2));
    const drawEnd = Math.min(viewH, Math.floor(viewH / 2 + stripeH / 2));

    rectfill(viewX + x, drawStart, viewX + x + 1, drawEnd, 6);
}
It already looks like a corridor. Every wall is the same flat grey, but the sense of depth is unmistakable. The minimap on the left shows the same scene from above — makes it easy to understand what the 3D view is doing.
Moving Through the World
A static view isn't much fun. Let's add movement: up and down arrows to walk forward and backward, left and right to rotate.
Collision detection is straightforward. Before committing to a new position, check whether the destination cell is a wall. We test the X and Y axes separately so the player slides along walls instead of stopping dead:
const moveSpeed = 0.05;
const rotSpeed = 0.05;

// inside update()
if (btn('ArrowLeft')) pa -= rotSpeed;
if (btn('ArrowRight')) pa += rotSpeed;

if (btn('ArrowUp')) {
    const nx = px + Math.cos(pa) * moveSpeed;
    const ny = py + Math.sin(pa) * moveSpeed;

    if (map[Math.floor(py)][Math.floor(nx)] === 0) px = nx;
    if (map[Math.floor(ny)][Math.floor(px)] === 0) py = ny;
}

if (btn('ArrowDown')) {
    const nx = px - Math.cos(pa) * moveSpeed;
    const ny = py - Math.sin(pa) * moveSpeed;

    if (map[Math.floor(py)][Math.floor(nx)] === 0) px = nx;
    if (map[Math.floor(ny)][Math.floor(px)] === 0) py = ny;
}
Walking in raycaster space is simpler than tile-based movement. The player is always at a floating-point position, and collision is a map array lookup — map[Math.floor(y)][Math.floor(x)]. The separate axis check works the same way as the platformer tutorial's moveX/moveY separation: try one axis, revert if blocked, then try the other.
Texture Sampling
Flat-colored walls get the job done, but textured walls are where raycasting really shines. Instead of filling each strip with a single color, we'll read pixel colors from a sprite in the sprites object.
The wall sprite is an 8x8 grid of palette color indices — the same format every other sprite in the engine uses. To map it onto a wall strip we need two texture coordinates:
- tx (the column): computed from
wallX, the fractional position where the ray hit the wall face. Multiply by 8 to get a sprite column index (0–7). - ty (the row): for each screen pixel in the wall strip, interpolate from the top of the sprite to the bottom.
texStep = 8 / stripeHeighttells us how much to advance per pixel.
const sprites = {
    wall: [
        // 8x8 brick pattern — edit this to change how walls look
        4, 4, 4, 5, 4, 4, 4, 4,
        4, 4, 4, 5, 4, 4, 4, 4,
        5, 5, 5, 5, 5, 5, 5, 5,
        4, 4, 4, 4, 4, 5, 4, 4,
        4, 4, 4, 4, 4, 5, 4, 4,
        5, 5, 5, 5, 5, 5, 5, 5,
        4, 4, 4, 5, 4, 4, 4, 4,
        4, 4, 4, 5, 4, 4, 4, 4,
    ],
};

// after DDA finds a wall hit, compute the texture column
let wallX;
if (side === 0) {
    wallX = py + perpDist * rdy;
} else {
    wallX = px + perpDist * rdx;
}
wallX -= Math.floor(wallX);

const tx = Math.floor(wallX * 8);

// draw the wall stripe pixel by pixel
const texStep = 8 / stripeH;
let texPos = (drawStart - viewH / 2 + stripeH / 2) * texStep;

for (let sy = drawStart; sy < drawEnd; sy++) {
    const ty = Math.min(7, Math.floor(texPos));
    texPos += texStep;

    const color = sprites.wall[ty * 8 + tx];
    if (color >= 0) pset(viewX + x, sy, color);
}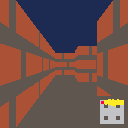
The jump from flat grey to textured bricks is pretty dramatic, even at 128x128. And because the texture lives in sprites, you can swap in any 8x8 pattern — stone, wood, pixel art, whatever.
Tip: Try editing the wall sprite array to draw your own wall texture. Each number is a palette color index (0–15), and -1 means transparent. The 8 rows of 8 values map directly to the 8x8 pixel grid.
Distance Shading
Textured walls look good, but everything has the same brightness regardless of distance. Distance shading fixes that — close walls are bright, far walls fade into darkness.
The 16-color palette has no brightness channel, so we can't multiply by 0.5. Instead we define a lookup table that maps each color to a "darker" neighbor. Apply it zero, one, or two times depending on distance.
We can also shade X-face walls differently from Y-face walls. DDA already tracks which face was hit, so this comes for free — it's the same trick Wolfenstein 3D used to make north/south walls visually distinct from east/west:
// maps each palette color to a darker variant
const darken = [
    0, 0, 0, 0, 2, 0, 5, 6,
    2, 4, 9, 3, 1, 1, 2, 9,
];

// inside the wall stripe loop, after sampling the texture color
let color = sprites.wall[ty * 8 + tx];
if (color < 0) continue;

// shade by distance: 0, 1, or 2 darkening passes
if (perpDist >= 4) {
    color = darken[darken[color]];
} else if (perpDist >= 2) {
    color = darken[color];
}

// X-face walls get one extra darken pass for orientation shading
if (side === 0) {
    color = darken[color];
}

pset(viewX + x, sy, color);
The darken array is a design choice, not an algorithm. Each entry maps a color to a subjectively darker neighbor. Tweak it to get warmer or cooler shading — there's no single "correct" mapping.
Putting It All Together
Here's the whole thing: a textured, shaded, navigable 3D dungeon with a minimap overlay. About 150 lines of arithmetic and pset calls. No 3D library. No matrices. A grid, some trig, and a loop:
engine.scope(({ start, cls, rectfill, pset, line, btn, text }) => {
    const map = [
        [1, 1, 1, 1, 1, 1, 1, 1],
        [1, 0, 0, 0, 0, 0, 0, 1],
        [1, 0, 1, 0, 0, 1, 0, 1],
        [1, 0, 0, 0, 0, 0, 0, 1],
        [1, 0, 0, 0, 0, 0, 0, 1],
        [1, 0, 1, 0, 0, 1, 0, 1],
        [1, 0, 0, 0, 0, 0, 0, 1],
        [1, 1, 1, 1, 1, 1, 1, 1],
    ];

    const sprites = {
        wall: [
            4, 4, 4, 5, 4, 4, 4, 4,
            4, 4, 4, 5, 4, 4, 4, 4,
            5, 5, 5, 5, 5, 5, 5, 5,
            4, 4, 4, 4, 4, 5, 4, 4,
            4, 4, 4, 4, 4, 5, 4, 4,
            5, 5, 5, 5, 5, 5, 5, 5,
            4, 4, 4, 5, 4, 4, 4, 4,
            4, 4, 4, 5, 4, 4, 4, 4,
        ],
    };

    const darken = [
        0, 0, 0, 0, 2, 0, 5, 6,
        2, 4, 9, 3, 1, 1, 2, 9,
    ];

    let px = 1.5;
    let py = 1.5;
    let pa = 0;
    const fov = 0.66;
    const moveSpeed = 0.05;
    const rotSpeed = 0.05;
    const cell = 4;
    const viewX = 32;
    const viewW = 96;
    const viewH = 128;

    function update() {
        if (btn('ArrowLeft')) pa -= rotSpeed;
        if (btn('ArrowRight')) pa += rotSpeed;

        if (btn('ArrowUp')) {
            const nx = px + Math.cos(pa) * moveSpeed;
            const ny = py + Math.sin(pa) * moveSpeed;

            if (map[Math.floor(py)][Math.floor(nx)] === 0) px = nx;
            if (map[Math.floor(ny)][Math.floor(px)] === 0) py = ny;
        }

        if (btn('ArrowDown')) {
            const nx = px - Math.cos(pa) * moveSpeed;
            const ny = py - Math.sin(pa) * moveSpeed;

            if (map[Math.floor(py)][Math.floor(nx)] === 0) px = nx;
            if (map[Math.floor(ny)][Math.floor(px)] === 0) py = ny;
        }
    }

    function draw() {
        cls(0);

        for (let y = 0; y < 8; y++) {
            for (let x = 0; x < 8; x++) {
                const color = map[y][x] === 1 ? 5 : 6;
                rectfill(
                    x * cell,
                    y * cell,
                    (x + 1) * cell,
                    (y + 1) * cell,
                    color,
                );
            }
        }

        rectfill(viewX, 0, viewX + viewW, viewH / 2, 1);
        rectfill(viewX, viewH / 2, viewX + viewW, viewH, 5);

        const dirX = Math.cos(pa);
        const dirY = Math.sin(pa);
        const planeX = -dirY * fov;
        const planeY = dirX * fov;

        for (let x = 0; x < viewW; x++) {
            const cameraX = (2 * x) / viewW - 1;
            const rdx = dirX + planeX * cameraX;
            const rdy = dirY + planeY * cameraX;

            let mapX = Math.floor(px);
            let mapY = Math.floor(py);

            const deltaDistX =
                Math.abs(rdx) < 1e-10 ? 1e30 : Math.abs(1 / rdx);
            const deltaDistY =
                Math.abs(rdy) < 1e-10 ? 1e30 : Math.abs(1 / rdy);

            let stepX, stepY, sideDistX, sideDistY;

            if (rdx < 0) {
                stepX = -1;
                sideDistX = (px - mapX) * deltaDistX;
            } else {
                stepX = 1;
                sideDistX = (mapX + 1 - px) * deltaDistX;
            }

            if (rdy < 0) {
                stepY = -1;
                sideDistY = (py - mapY) * deltaDistY;
            } else {
                stepY = 1;
                sideDistY = (mapY + 1 - py) * deltaDistY;
            }

            let side;

            while (true) {
                if (sideDistX < sideDistY) {
                    sideDistX += deltaDistX;
                    mapX += stepX;
                    side = 0;
                } else {
                    sideDistY += deltaDistY;
                    mapY += stepY;
                    side = 1;
                }
                if (map[mapY]?.[mapX] === 1) break;
            }

            const perpDist =
                side === 0
                    ? sideDistX - deltaDistX
                    : sideDistY - deltaDistY;

            const stripeH = Math.floor(viewH / perpDist);
            const drawStart = Math.max(
                0,
                Math.floor(viewH / 2 - stripeH / 2),
            );
            const drawEnd = Math.min(
                viewH,
                Math.floor(viewH / 2 + stripeH / 2),
            );

            let wallHit;
            if (side === 0) {
                wallHit = py + perpDist * rdy;
            } else {
                wallHit = px + perpDist * rdx;
            }
            wallHit -= Math.floor(wallHit);

            const tx = Math.floor(wallHit * 8);
            const texStep = 8 / stripeH;
            let texPos = (drawStart - viewH / 2 + stripeH / 2) * texStep;

            for (let sy = drawStart; sy < drawEnd; sy++) {
                const ty = Math.min(7, Math.floor(texPos));
                texPos += texStep;

                let color = sprites.wall[ty * 8 + tx];
                if (color < 0) continue;

                if (perpDist >= 4) {
                    color = darken[darken[color]];
                } else if (perpDist >= 2) {
                    color = darken[color];
                }

                if (side === 0) {
                    color = darken[color];
                }

                pset(viewX + x, sy, color);
            }

            const hitX = px + rdx * perpDist;
            const hitY = py + rdy * perpDist;
            line(
                Math.floor(px * cell),
                Math.floor(py * cell),
                Math.floor(hitX * cell),
                Math.floor(hitY * cell),
                10,
            );
        }

        rectfill(
            Math.floor(px * cell) - 1,
            Math.floor(py * cell) - 1,
            Math.floor(px * cell) + 2,
            Math.floor(py * cell) + 2,
            8,
        );

        line(
            Math.floor(px * cell),
            Math.floor(py * cell),
            Math.floor(px * cell + Math.cos(pa) * 4),
            Math.floor(py * cell + Math.sin(pa) * 4),
            8,
        );

        text('arrows to move', 34, 2, 7);
    }

    start({ sprites, sounds: {}, update, draw, target });
});
Take some time to edit the map array — carve out new rooms and corridors. Change the wall sprite to give your dungeon a different look. The engine doesn't care what's in the sprite. It reads color indices and draws them.
Going Further
- Multiple wall textures — use different map cell values (2 for stone, 3 for wood) and sample a different sprite per wall type based on the cell that was hit
- Animated textures — swap the wall sprite on a timer for flickering torches or pulsing portal walls
- Sprites and enemies — sort billboard objects by distance and draw them as scaled sprites over the 3D view, using a per-column depth buffer to clip them behind walls
- Door tiles — a cell that opens when the player presses a key nearby, sliding the wall out of the map array
- Floor and ceiling textures — extend the per-row loop to cast rays against the floor plane for each non-wall pixel (a lot more expensive, but possible at 128x128)
- A larger map — the 8x8 grid can scale to 16x16 or 32x32, just shrink the minimap cell size to match