How to Take Screenshots
Your game renders to a canvas, but there's no built-in way to save what's on screen. Maybe players want to share a high score, or you're building a tool that needs an export button. screenshot() captures the canvas as a PNG data URL — one call and you've got an image you can download, display, or send wherever you like.
We're gonna build a tiny drawing app to see how it works. If you want a full-featured pixel editor, the sprite editor has everything you need — we're keeping this one simple so the focus stays on screenshots.
A Blank Canvas
First we need something worth screenshotting. Let's set up a 16x16 pixel grid you can draw on with the mouse. Each cell is 7 pixels wide, so the whole grid fits comfortably in the 128x128 canvas:
engine.scope(({ start, cls, rectfill, rect, mouse, mdown, dragging }) => {
    const gridSize = 16;
    const pixelSize = 7;
    const gridX = 1;
    const gridY = 1;
    const canvas = new Array(gridSize * gridSize).fill(-1);

    function update() {
        if (mdown() || dragging()) {
            const pos = mouse();
            const col = Math.floor((pos.x - gridX) / pixelSize);
            const row = Math.floor((pos.y - gridY) / pixelSize);

            if (col >= 0 && col < gridSize && row >= 0 && row < gridSize) {
                canvas[row * gridSize + col] = 7;
            }
        }
    }

    function draw() {
        cls(0);

        for (let row = 0; row < gridSize; row++) {
            for (let col = 0; col < gridSize; col++) {
                const x = gridX + col * pixelSize;
                const y = gridY + row * pixelSize;
                const color = canvas[row * gridSize + col];

                if (color >= 0) {
                    rectfill(x, y, x + pixelSize - 1, y + pixelSize - 1, color);
                }
            }
        }

        rect(gridX - 1, gridY - 1, gridX + gridSize * pixelSize, gridY + gridSize * pixelSize, 5);
    }

    start({ sprites: {}, sounds: {}, update, draw, target });
});
We store pixel colors in a flat array — 256 entries, one per cell. -1 means empty, 0–15 maps to a palette color. Each frame we check if the mouse is down or dragging, figure out which cell it's over, and set that cell to white.
Adding a Color Palette
White on black is a bit limiting. Let's add a row of 16 color swatches along the bottom so you can pick any palette color before drawing:
engine.scope(({ start, cls, rectfill, rect, mouse, mdown, click, dragging }) => {
    const gridSize = 16;
    const pixelSize = 7;
    const gridX = 1;
    const gridY = 1;
    const canvas = new Array(gridSize * gridSize).fill(-1);

    let selectedColor = 7;
    const paletteY = 118;
    const swatchSize = 8;

    function update() {
        const pos = mouse();

        if (click()) {
            if (pos.y >= paletteY && pos.y < paletteY + swatchSize) {
                const swatch = Math.floor(pos.x / swatchSize);
                if (swatch >= 0 && swatch < 16) {
                    selectedColor = swatch;
                    return;
                }
            }
        }

        if (mdown() || dragging()) {
            const col = Math.floor((pos.x - gridX) / pixelSize);
            const row = Math.floor((pos.y - gridY) / pixelSize);

            if (col >= 0 && col < gridSize && row >= 0 && row < gridSize) {
                canvas[row * gridSize + col] = selectedColor;
            }
        }
    }

    function draw() {
        cls(0);

        for (let row = 0; row < gridSize; row++) {
            for (let col = 0; col < gridSize; col++) {
                const x = gridX + col * pixelSize;
                const y = gridY + row * pixelSize;
                const color = canvas[row * gridSize + col];

                if (color >= 0) {
                    rectfill(x, y, x + pixelSize - 1, y + pixelSize - 1, color);
                }
            }
        }

        rect(gridX - 1, gridY - 1, gridX + gridSize * pixelSize, gridY + gridSize * pixelSize, 5);

        for (let i = 0; i < 16; i++) {
            const x = i * swatchSize;
            rectfill(x, paletteY, x + swatchSize - 1, paletteY + swatchSize - 1, i);

            if (i === selectedColor) {
                rect(x, paletteY, x + swatchSize - 1, paletteY + swatchSize - 1, 7);
            }
        }
    }

    start({ sprites: {}, sounds: {}, update, draw, target });
});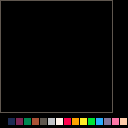
Clicking a swatch selects that color. We check whether the click landed in the palette row before checking the drawing grid. The selected swatch gets a white border so you always know what's active.
How screenshot() Works
Now for the fun part. Call screenshot() and it returns a PNG data URL — a long string starting with data:image/png;base64,... that contains the entire canvas image encoded as base64:
// screenshot() returns a PNG data URL string
const dataUrl = screenshot();

// it looks like this:
// "data:image/png;base64,iVBORw0KGgo..."

// you can use it as an image source
const img = new Image();
img.src = dataUrl;
That string works anywhere you'd use an image URL. Set it as the src on an <img> element, POST it to a server, or — as we'll do next — trigger a file download.
Tip: screenshot() captures whatever is currently on the canvas — including UI elements like the palette and button. If you want a clean screenshot of just the artwork, you could clear and redraw only the canvas pixels before calling screenshot(), then redraw the full UI on the next frame.
Triggering a Download
The standard way to trigger a file download from JavaScript is to create an invisible <a> element, set its href to the data URL, give it a download filename, and click it programmatically. Let's wire it to the S key:
// inside update()
if (btnp('s')) {
    const dataUrl = screenshot();
    const link = document.createElement('a');
    link.download = 'my-drawing.png';
    link.href = dataUrl;
    link.click();
}
Press S and the browser saves a my-drawing.png file. The image will be 128x128 pixels — that's the actual canvas resolution, regardless of how large it looks on screen.
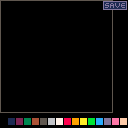
Adding a Download Button
A keyboard shortcut is nice, but a visible button is way more discoverable. Let's draw a "SAVE" button in the top-right corner and check for clicks on it:
// draw a "SAVE" button
const btnX = 104;
const btnY = 1;
const btnW = 23;
const btnH = 9;
rectfill(btnX, btnY, btnX + btnW, btnY + btnH, 1);
rect(btnX, btnY, btnX + btnW, btnY + btnH, 13);
text('SAVE', btnX + 3, btnY + 2, 13);

// in update, detect click on the button
const pos = mouse();
if (click()) {
    if (pos.x >= btnX && pos.x <= btnX + btnW && pos.y >= btnY && pos.y <= btnY + btnH) {
        const dataUrl = screenshot();
        const link = document.createElement('a');
        link.download = 'drawing.png';
        link.href = dataUrl;
        link.click();
    }
}
We draw the button with rectfill for the background, rect for the border, and text for the label. In update we check if a click landed inside the button's bounding box — if so, grab the screenshot and trigger the download.
Putting It All Together
Here's the complete drawing app with the color palette, SAVE button, and S keyboard shortcut all wired up. We also add a little "Saved!" message that flashes for a second after each download:
engine.scope(
    ({ start, cls, rectfill, rect, text, mouse, mdown, mup, click, dragging, btnp, screenshot }) => {
        const gridSize = 16;
        const pixelSize = 7;
        const gridX = 1;
        const gridY = 1;
        const canvas = new Array(gridSize * gridSize).fill(-1);

        let selectedColor = 7;
        const paletteY = 118;
        const swatchSize = 8;

        const btnX = 104;
        const btnY = 1;
        const btnW = 23;
        const btnH = 9;

        let statusText = '';
        let statusTimer = 0;

        function save() {
            const dataUrl = screenshot();
            const link = document.createElement('a');
            link.download = 'drawing.png';
            link.href = dataUrl;
            link.click();

            statusText = 'Saved!';
            statusTimer = 60;
        }

        function update() {
            if (statusTimer > 0) {
                statusTimer--;
                if (statusTimer === 0) {
                    statusText = '';
                }
            }

            if (btnp('s')) {
                save();
                return;
            }

            const pos = mouse();

            if (click()) {
                if (pos.x >= btnX && pos.x <= btnX + btnW && pos.y >= btnY && pos.y <= btnY + btnH) {
                    save();
                    return;
                }

                if (pos.y >= paletteY && pos.y < paletteY + swatchSize) {
                    const swatch = Math.floor(pos.x / swatchSize);
                    if (swatch >= 0 && swatch < 16) {
                        selectedColor = swatch;
                        return;
                    }
                }
            }

            if (mdown() || dragging()) {
                const col = Math.floor((pos.x - gridX) / pixelSize);
                const row = Math.floor((pos.y - gridY) / pixelSize);

                if (col >= 0 && col < gridSize && row >= 0 && row < gridSize) {
                    canvas[row * gridSize + col] = selectedColor;
                }
            }
        }

        function draw() {
            cls(0);

            for (let row = 0; row < gridSize; row++) {
                for (let col = 0; col < gridSize; col++) {
                    const x = gridX + col * pixelSize;
                    const y = gridY + row * pixelSize;
                    const color = canvas[row * gridSize + col];

                    if (color >= 0) {
                        rectfill(x, y, x + pixelSize - 1, y + pixelSize - 1, color);
                    }
                }
            }

            rect(gridX - 1, gridY - 1, gridX + gridSize * pixelSize, gridY + gridSize * pixelSize, 5);

            for (let i = 0; i < 16; i++) {
                const x = i * swatchSize;
                rectfill(x, paletteY, x + swatchSize - 1, paletteY + swatchSize - 1, i);

                if (i === selectedColor) {
                    rect(x, paletteY, x + swatchSize - 1, paletteY + swatchSize - 1, 7);
                }
            }

            rectfill(btnX, btnY, btnX + btnW, btnY + btnH, 1);
            rect(btnX, btnY, btnX + btnW, btnY + btnH, 13);
            text('SAVE', btnX + 3, btnY + 2, 13);

            if (statusText) {
                text(statusText, btnX + 2, btnY + btnH + 3, 11);
            }
        }

        start({ sprites: {}, sounds: {}, update, draw, target });
    },
);
Going Further
A few directions you could take this:
- Timed screenshots — capture every N seconds and stitch the images together for a timelapse of your game
- Clean captures — redraw only game content (no UI) before calling
screenshot(), then restore the UI on the next frame - Share button — POST the data URL to a server, or convert it to a Blob and use the Web Share API
- Animated GIFs — capture multiple frames and combine them with a library like gif.js