How to Build Click-to-Move Navigation
Most games need a way to say "go there." Strategy games, RPGs, point-and-click adventures — they all use the same idea. You click a spot, and the character walks to it, routing around whatever's in the way. It's one of the most common movement systems out there, and it's built on a surprisingly simple algorithm.
We're going to build two modes: grid-snap (the character hops one tile at a time) and free movement (the character glides smoothly between cells). Both use BFS pathfinding to route around obstacles. The whole map is a 16x16 tile grid that fills the 128x128 screen exactly — no camera needed. If you want a refresher on tilemaps, check out the map system tutorial. For mouse input, the custom cursors tutorial is a good starting point.
The Grid
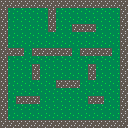
Every top-down game starts with a grid. Each cell is either floor or wall. We define two 8x8 sprites — dark green for floor, dark grey for walls — and use mset() to place them on the tilemap. 16 tiles at 8 pixels each fills the 128-pixel screen exactly.
The grid layout is a 2D array of 0s and 1s. In init(), we loop through it and call mset() for each cell. map(0) renders the whole thing. Let's set it up:
const sprites = {
    floor: [[
        3,  3,  3,  3,  3,  3,  3,  3,
        3,  3,  3,  3,  3,  3, 11,  3,
        3,  3,  3,  3,  3,  3,  3,  3,
        3, 11,  3,  3,  3,  3,  3,  3,
        3,  3,  3,  3,  3,  3,  3,  3,
        3,  3,  3,  3,  3, 11,  3,  3,
        3,  3,  3,  3,  3,  3,  3,  3,
        3,  3,  3,  3,  3,  3,  3,  3,
    ], null],
    wall: [[
        5,  5,  5,  5,  5,  5,  5,  5,
        5,  6,  5,  5,  5,  6,  5,  5,
        5,  5,  5,  5,  5,  5,  5,  5,
        5,  5,  5,  6,  5,  5,  5,  5,
        5,  5,  5,  5,  5,  5,  5,  5,
        5,  5,  6,  5,  5,  5,  5,  6,
        5,  5,  5,  5,  5,  5,  5,  5,
        5,  5,  5,  5,  5,  6,  5,  5,
    ], null],
};

// prettier-ignore
const grid = [
    [1,1,1,1,1,1,1,1,1,1,1,1,1,1,1,1],
    [1,0,0,0,0,0,1,0,0,0,0,0,0,0,0,1],
    [1,0,0,0,0,0,1,0,0,0,0,0,0,0,0,1],
    [1,0,0,0,0,0,1,0,0,1,1,1,0,0,0,1],
    [1,0,0,0,0,0,0,0,0,0,0,0,0,0,0,1],
    [1,0,0,0,0,0,0,0,0,0,0,0,0,0,0,1],
    [1,1,1,0,1,1,1,1,1,0,1,1,1,1,0,1],
    [1,0,0,0,0,0,0,0,0,0,0,0,0,0,0,1],
    [1,0,0,0,1,0,0,0,0,0,0,1,0,0,0,1],
    [1,0,0,0,1,0,0,0,0,0,0,1,0,0,0,1],
    [1,0,0,0,0,0,0,1,1,1,0,0,0,0,0,1],
    [1,0,0,0,0,0,0,0,0,0,0,0,0,0,0,1],
    [1,0,1,1,1,0,0,0,0,0,0,1,1,0,0,1],
    [1,0,0,0,0,0,0,0,0,0,0,0,0,0,0,1],
    [1,0,0,0,0,0,0,0,0,0,0,0,0,0,0,1],
    [1,1,1,1,1,1,1,1,1,1,1,1,1,1,1,1],
];

let selX = -1, selY = -1;

function init() {
    for (let y = 0; y < 16; y++)
        for (let x = 0; x < 16; x++)
            mset(x, y, grid[y][x] === 1 ? 'wall' : 'floor');
}

function update() {
    if (click()) {
        const pos = mouse();
        selX = Math.max(0, Math.min(15, Math.floor(pos.x / 8)));
        selY = Math.max(0, Math.min(15, Math.floor(pos.y / 8)));
    }
}

function draw() {
    cls(0);
    map(0);
    if (selX >= 0) {
        rect(selX * 8, selY * 8, selX * 8 + 8, selY * 8 + 8, 10);
        text(selX + ',' + selY, 1, 1, 7);
    }
}
Math.floor(pos.x / 8) converts a pixel position to a grid coordinate. We clamp to 0–15 so clicks at the screen edges don't go out of bounds. The yellow outline highlights the clicked cell — later, that becomes our movement target.
Placing the Player
The player needs a position on the grid. We track it as integers — grid coordinates, not pixels. A blue character sprite sits on the tilemap, and a yellow outline marks where we last clicked. Clicks on walls get rejected, because there's no point trying to walk into solid rock:
let playerX = 1, playerY = 1;
let targetX = -1, targetY = -1;

// inside update()
if (click()) {
    const pos = mouse();
    const gx = Math.max(0, Math.min(15, Math.floor(pos.x / 8)));
    const gy = Math.max(0, Math.min(15, Math.floor(pos.y / 8)));
    if (mget(gx, gy, 0) !== 'wall') {
        targetX = gx;
        targetY = gy;
    }
}

// inside draw()
cls(0);
map(0);
if (targetX >= 0)
    rect(targetX * 8, targetY * 8, targetX * 8 + 8, targetY * 8 + 8, 10);
spr('player', playerX * 8, playerY * 8);
spr('player', playerX * 8, playerY * 8) draws the player at the right pixel position. mget(gx, gy, 0) reads the tile at those coordinates — if it's 'wall', we skip it. The target marker is a yellow rect() outline around the destination cell.
Grid-Snap Movement
Now let's make the player move. Every 8 frames (~133ms), we take one step toward the target. The naive approach picks whichever axis has the larger distance and moves one cell in that direction. Before stepping, we check if the next cell is a wall:
let moveTimer = 0;

// inside update(), after click handling
if (targetX >= 0 && (playerX !== targetX || playerY !== targetY)) {
    moveTimer++;
    if (moveTimer >= 8) {
        moveTimer = 0;
        const dx = targetX - playerX;
        const dy = targetY - playerY;
        let nx = playerX, ny = playerY;
        if (Math.abs(dx) >= Math.abs(dy)) nx += Math.sign(dx);
        else ny += Math.sign(dy);
        if (mget(nx, ny, 0) !== 'wall') {
            playerX = nx;
            playerY = ny;
        }
    }
}
This works fine in open areas. But try clicking on the far side of a wall — the player walks right up to it and stops. The greedy approach always moves directly toward the target. It has no idea how to go around things. We need pathfinding.
Try it: Click a cell on the opposite side of the long wall in row 6. The player walks straight into the wall and stops. This is the problem pathfinding solves.
Pathfinding with BFS
Breadth-first search explores outward from the start, one cell at a time, until it hits the goal. Every cell remembers which cell it came from. Once we reach the goal, we trace those parents backward to build the shortest path.
function findPath(sx, sy, gx, gy) {
    if (mget(gx, gy, 0) === 'wall') return null;

    const key = (x, y) => x + ',' + y;
    const queue = [{ x: sx, y: sy }];
    const visited = new Set([key(sx, sy)]);
    const parent = {};

    while (queue.length > 0) {
        const { x, y } = queue.shift();
        if (x === gx && y === gy) {
            const path = [];
            let cx = gx, cy = gy;
            while (cx !== sx || cy !== sy) {
                path.push({ x: cx, y: cy });
                const p = parent[key(cx, cy)];
                cx = p.x;
                cy = p.y;
            }
            return path.reverse();
        }
        for (const [dx, dy] of [[0, -1], [1, 0], [0, 1], [-1, 0]]) {
            const nx = x + dx, ny = y + dy;
            if (nx < 0 || nx > 15 || ny < 0 || ny > 15) continue;
            if (visited.has(key(nx, ny))) continue;
            if (mget(nx, ny, 0) === 'wall') continue;
            visited.add(key(nx, ny));
            parent[key(nx, ny)] = { x, y };
            queue.push({ x: nx, y: ny });
        }
    }
    return null;
}
The function takes a start and goal position and returns an array of {x, y} steps — or null if the goal is unreachable. It uses mget() to check each neighbor, skipping walls. The path excludes the start and includes the goal, so the player walks from their current cell through each step in sequence.
Let's wire it up. On click, we run findPath() and store the result. In update(), we pop one step every 8 frames. In draw(), orange dots show the remaining path:

The player routes around walls now. BFS guarantees the shortest path, and on a 16x16 grid it runs in microseconds — no performance concerns at all.
Tip: BFS explores 4 directions (up, down, left, right). For diagonal movement, expand the neighbor list to 8 directions — but add corner-cutting checks to prevent squeezing through diagonal wall gaps.
Free Movement
Grid-snap movement looks a bit stiff — the player teleports from tile to tile. Free movement slides the player smoothly between waypoints. The pathfinding is identical (BFS in grid space), but instead of snapping to each cell, we move toward the cell center at a fixed pixel speed:
let playerPx = 12, playerPy = 12;
let path = [];
const speed = 1.5;

// inside update(), after click sets path via findPath()
if (path.length > 0) {
    const tx = path[0].x * 8 + 4;
    const ty = path[0].y * 8 + 4;
    const dx = tx - playerPx;
    const dy = ty - playerPy;
    const dist = Math.sqrt(dx * dx + dy * dy);
    if (dist < 1) {
        playerPx = tx;
        playerPy = ty;
        path.shift();
    } else {
        playerPx += (dx / dist) * speed;
        playerPy += (dy / dist) * speed;
    }
}

// inside draw()
spr('player', Math.floor(playerPx) - 4, Math.floor(playerPy) - 4);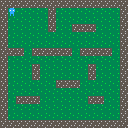
The path is still an array of grid cells. Each frame, we calculate the direction from the player to the center of the next cell (path[0].x * 8 + 4), normalize it, and multiply by the speed. When we're within 1 pixel, we snap to the center and advance to the next step. The player position is now floating-point pixels instead of integer grid cells.
Putting It All Together
Here's both modes in one example. Press 1 for grid-snap, 2 for free movement. The same BFS pathfinding powers both — the only difference is how the player follows the path. A crosshair cursor, pulsing target marker, and mode label round it out:
let mode = 'snap';

// inside init()
cursor('crosshair');

// inside update()
if (btnp('1') && mode !== 'snap') {
    mode = 'snap';
    playerX = Math.floor(playerPx / 8);
    playerY = Math.floor(playerPy / 8);
    path = [];
    targetX = -1;
}
if (btnp('2') && mode !== 'free') {
    mode = 'free';
    playerPx = playerX * 8 + 4;
    playerPy = playerY * 8 + 4;
    path = [];
    targetX = -1;
}

// movement depends on mode
if (mode === 'snap') {
    // grid-snap: pop path every 8 frames
} else {
    // free: lerp toward path[0] each frame
}

// inside draw()
if (mode === 'snap')
    spr('player', playerX * 8, playerY * 8);
else
    spr('player', Math.floor(playerPx) - 4, Math.floor(playerPy) - 4);
text(mode === 'snap' ? 'SNAP [1]' : 'FREE [2]', 1, 1, 7);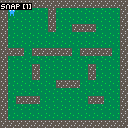
Switching modes syncs the position — snap mode rounds to the nearest cell, free mode places the player at the cell center. The path clears on switch so there's no leftover movement from the previous mode. Take some time to edit the map array and try different wall layouts — corridors, mazes, open arenas. The pathfinding handles all of it.
Going Further
- Diagonal movement — expand BFS to 8 neighbors for diagonal paths, and add corner-cutting checks to prevent squeezing through diagonal wall gaps
- Weighted movement — use Dijkstra or A* instead of BFS to prefer certain terrain (mud = slow, road = fast)
- Camera scrolling — combine with
camera()for maps larger than the screen (see the map system tutorial) - Multiple units — click to select a unit, then click to move it, using the same pathfinding per-unit
- Fog of war — only render tiles the player has visited, using a separate "explored" layer