How to Build a Hint UI
Every game benefits from visual overlays. During development, you want debug grids, collision boxes, entity IDs — stuff you can toggle on and off without touching the game code. In a shipped game, the same pattern powers hint systems that highlight interactable objects or show the player where to go next. The technique is identical either way: a boolean flag, a keypress to flip it, and some extra draw calls gated behind an if.
We'll build a small grid puzzle where the player collects keys to open doors, then layer three independent overlays on top: object highlights, connection lines, and a pathfinding hint. By the end you'll have a pattern you can drop into any project. We'll use it again in an upcoming sokoban tutorial for its hint system.
The Puzzle
We need something to overlay, so let's start with a tiny grid puzzle. An 8×8 grid on the 128×128 canvas gives us 16-pixel tiles — enough room for walls, keys, doors, and an exit. The grid is a 2D array where 1 means wall and 0 means floor:
const T = 16;

const grid = [
    [1, 1, 1, 1, 1, 1, 1, 1],
    [1, 0, 0, 0, 1, 0, 0, 1],
    [1, 0, 1, 0, 0, 0, 0, 1],
    [1, 0, 1, 1, 1, 0, 1, 1],
    [1, 0, 0, 0, 0, 0, 0, 1],
    [1, 1, 1, 0, 1, 1, 0, 1],
    [1, 0, 0, 0, 0, 0, 0, 1],
    [1, 1, 1, 1, 1, 1, 1, 1],
];
Keys and doors live in separate arrays so we can track their state independently. Each key has a color that matches a door — pick up the red key, walk into the red door, it opens:
const keys = [
    { x: 1, y: 1, color: 8, collected: false },
    { x: 6, y: 1, color: 9, collected: false },
    { x: 1, y: 6, color: 12, collected: false },
];

const doors = [
    { x: 4, y: 2, color: 8, open: false },
    { x: 3, y: 5, color: 9, open: false },
    { x: 5, y: 3, color: 12, open: false },
];
Movement uses btnp() for one-tile-per-press grid snapping. Before moving, we check if the target tile is a locked door the player has the matching key for — if so, open it. Then we check if it's still blocked. If it's clear, we move there and pick up any key on the tile:
function update() {
if (won) return;
let nx = px;
let ny = py;
if (btnp('ArrowLeft')) nx--;
if (btnp('ArrowRight')) nx++;
if (btnp('ArrowUp')) ny--;
if (btnp('ArrowDown')) ny++;
if (nx === px && ny === py) return;
if (nx < 0 || nx > 7 || ny < 0 || ny > 7) return;
for (let d of doors) {
if (!d.open && d.x === nx && d.y === ny) {
for (let k of keys) {
if (k.collected && k.color === d.color) {
d.open = true;
break;
}
}
}
}
if (isBlocked(nx, ny)) return;
px = nx;
py = ny;
for (let k of keys) {
if (!k.collected && k.x === px && k.y === py) {
k.collected = true;
}
}
if (px === exit.x && py === exit.y) won = true;
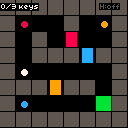
}Drawing is straightforward. Walls are dark grey rectfill, keys are colored circfill, doors are colored rectfill, and the player is a white circle. The exit is a green tile. A text() call in the corner tracks collected keys:
function draw(time, frame) {
    cls(0);

    for (let y = 0; y < 8; y++) {
        for (let x = 0; x < 8; x++) {
            if (grid[y][x] === 1) {
                rectfill(x * T, y * T, x * T + T - 1, y * T + T - 1, 5);
            }
        }
    }

    rectfill(exit.x * T, exit.y * T, exit.x * T + T - 1, exit.y * T + T - 1, 11);

    for (let d of doors) {
        if (!d.open) {
            rectfill(d.x * T + 2, d.y * T, d.x * T + T - 3, d.y * T + T - 1, d.color);
        }
    }

    for (let k of keys) {
        if (!k.collected) {
            circfill(k.x * T + T / 2, k.y * T + T / 2, 3, k.color);
        }
    }

    circfill(px * T + T / 2, py * T + T / 2, 3, 7);

    let collected = keys.filter((k) => k.collected).length;
    text(collected + '/' + keys.length + ' keys', 1, 1, 7);

    if (won) {
        text('you win!', 40, 60, 11);
    }
}
Highlighting Objects
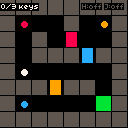
The puzzle works, but new players might not notice which objects they can interact with. Let's fix that with a highlight overlay — press H and pulsing outlines appear around every key, door, and the exit.
The whole thing is one boolean and one btnp() check:
let showHighlights = false;

function update() {
    if (btnp('h')) showHighlights = !showHighlights;
    // ... rest of update
}
In draw(), after all the base game rendering, we check the flag and draw rect() outlines around every interactable object. To make them pulse, we alternate between bright yellow (10) and dark grey (5) every 10 frames using the frame counter:
if (showHighlights) {
    let pulse = Math.floor(frame / 10) % 2 === 0 ? 10 : 5;
    for (let k of keys) {
        if (!k.collected) {
            rect(k.x * T, k.y * T, k.x * T + T - 1, k.y * T + T - 1, pulse);
        }
    }
    for (let d of doors) {
        if (!d.open) {
            rect(d.x * T, d.y * T, d.x * T + T - 1, d.y * T + T - 1, pulse);
        }
    }
    rect(exit.x * T, exit.y * T, exit.x * T + T - 1, exit.y * T + T - 1, pulse);
}
One thing to watch out for: draw overlays after the base game. The engine draws in order, so later calls appear on top. If we drew the outlines before the keys, they'd be hidden behind them.
Drawing Connections
Highlights show what you can interact with, but not how things relate. A second overlay can fix that — lines from each key to the door it opens. This gets its own boolean and its own toggle key, completely independent of the highlight layer:
let showConnections = false;

function update() {
    if (btnp('h')) showHighlights = !showHighlights;
    if (btnp('j')) showConnections = !showConnections;
    // ... rest of update
}
We loop through uncollected keys, find the matching door, and draw a line() between their tile centers using the shared color. Once a key is collected or a door opens, that line disappears on its own:
if (showConnections) {
    for (let k of keys) {
        if (k.collected) continue;
        for (let d of doors) {
            if (d.open) continue;
            if (k.color === d.color) {
                line(
                    k.x * T + T / 2,
                    k.y * T + T / 2,
                    d.x * T + T / 2,
                    d.y * T + T / 2,
                    k.color,
                );
            }
        }
    }
}
Each overlay has its own flag, so players can turn on highlights, connections, both, or neither. The overlays don't know about each other — they're just independent blocks of conditional draw calls stacked at the end of draw().
Complete Example
For the third overlay, let's show the shortest path from the player to the exit. This uses a simple BFS (breadth-first search) — a queue-based flood fill that finds the shortest walkable route:
function findPath() {
    let queue = [{ x: px, y: py }];
    let cameFrom = {};
    let key = (x, y) => x + ',' + y;
    cameFrom[key(px, py)] = null;

    while (queue.length > 0) {
        let cur = queue.shift();
        if (cur.x === exit.x && cur.y === exit.y) {
            let result = [];
            let step = cur;
            while (step) {
                result.push(step);
                step = cameFrom[key(step.x, step.y)];
            }
            return result.reverse();
        }
        for (let [dx, dy] of [[-1, 0], [1, 0], [0, -1], [0, 1]]) {
            let nx = cur.x + dx;
            let ny = cur.y + dy;
            if (nx < 0 || nx > 7 || ny < 0 || ny > 7) continue;
            if (cameFrom[key(nx, ny)] !== undefined) continue;
            if (isBlocked(nx, ny)) continue;
            cameFrom[key(nx, ny)] = cur;
            queue.push({ x: nx, y: ny });
        }
    }
    return [];
}
We don't want to run BFS every frame — only when the path actually changes. A pathDirty flag handles this. Set it to true when the player moves or a door opens, clear it after recalculating:
let path = [];
let pathDirty = true;

// in update(), after moving:
px = nx;
py = ny;
pathDirty = true;

// and after opening a door:
d.open = true;
pathDirty = true;

// recalculate when needed:
if (pathDirty && showPath) {
    path = findPath();
    pathDirty = false;
}
Unlike the other overlays, the path draws before the game objects — it's floor highlighting, not an outline on top. Dark blue rectfill on each path tile makes it look like the floor is lit up underneath:
if (showPath && path.length > 0) {
    for (let tile of path) {
        rectfill(tile.x * T, tile.y * T, tile.x * T + T - 1, tile.y * T + T - 1, 1);
    }
}
All three overlays stack independently with their own toggle keys (H, J, K). The HUD shows which ones are active:
text('H:' + (showHighlights ? 'on' : 'off'), 60, 1, showHighlights ? 10 : 5);
text('J:' + (showConnections ? 'on' : 'off'), 82, 1, showConnections ? 10 : 5);
text('K:' + (showPath ? 'on' : 'off'), 105, 1, showPath ? 10 : 5);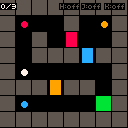
Going Further
- Debug mode — Use the same overlay pattern during development. Show collision boxes, tile coordinates, entity IDs, or an FPS counter — then toggle them off before shipping.
- Animated highlights — Fade overlays in and out instead of instant toggling. Vary the pulse speed by urgency — slow for passive hints, fast for critical warnings.
- Context-sensitive hints — Only highlight nearby objects, or reveal things progressively: the first press gives a vague hint, the second gets specific.
- Minimap overlay — Draw a scaled-down version of the level with key and door positions marked. Handy for larger worlds where the camera has scrolled away from important stuff.
- Overlay opacity — Draw every other pixel for subtler highlighting that doesn't obscure the game underneath.
- Hint cooldown — Limit how often hints can be activated to preserve the puzzle challenge. Show a timer in the HUD so the player knows when hints are available again.