How to Build a Virtual Cursor
Strategy games, tower defense, and console-style menus all need a cursor that moves with the keyboard instead of the mouse. The player navigates a world — sometimes bigger than the screen — using buttons, and "clicks" on things with an action key.
We're going to build a virtual cursor from scratch: a sprite that moves with arrow keys, a camera that scrolls a larger world, and click detection on objects. By the end you'll have a small interactive demo where you select colored tiles in a 256x192 world. If you want to see these ideas in a real game, the tower defense playground uses all of them. For mouse-following cursor basics, check out the custom cursors tutorial.
Hiding the Cursor and Defining a Sprite
Same as with a custom mouse cursor — hide the browser's default with cursor(false) in init(). For a virtual cursor, a crosshair works better than an arrow. The center gap lets you see what's underneath, which matters when you're selecting things:
const sprites = {
    cursor: [
        -1, -1, -1,  7, -1, -1, -1, -1,
        -1, -1, -1,  7, -1, -1, -1, -1,
        -1, -1, -1, -1, -1, -1, -1, -1,
         7,  7, -1, -1, -1,  7,  7, -1,
        -1, -1, -1, -1, -1, -1, -1, -1,
        -1, -1, -1,  7, -1, -1, -1, -1,
        -1, -1, -1,  7, -1, -1, -1, -1,
        -1, -1, -1, -1, -1, -1, -1, -1,
    ],
};

// inside init()
cursor(false);
Moving the Cursor with Buttons
Here's the key difference from a mouse cursor: instead of reading mouse(), we track cursor position as variables and update them each frame with btn(). btn() returns true every frame while the key is held, so movement feels smooth. We clamp to screen bounds to keep the cursor visible, and offset the sprite draw by 3 pixels (half of 8 minus 1 for the gap) to center the crosshair on the logical position:
engine.scope(({ start, cls, spr, btn, cursor }) => {
    const sprites = {
        cursor: [
            -1, -1, -1,  7, -1, -1, -1, -1,
            -1, -1, -1,  7, -1, -1, -1, -1,
            -1, -1, -1, -1, -1, -1, -1, -1,
             7,  7, -1, -1, -1,  7,  7, -1,
            -1, -1, -1, -1, -1, -1, -1, -1,
            -1, -1, -1,  7, -1, -1, -1, -1,
            -1, -1, -1,  7, -1, -1, -1, -1,
            -1, -1, -1, -1, -1, -1, -1, -1,
        ],
    };

    let cursorX = 64;
    let cursorY = 64;
    const speed = 2;

    function init() {
        cursor(false);
    }

    function update() {
        if (btn('ArrowLeft')) {
            cursorX -= speed;
        }
        if (btn('ArrowRight')) {
            cursorX += speed;
        }
        if (btn('ArrowUp')) {
            cursorY -= speed;
        }
        if (btn('ArrowDown')) {
            cursorY += speed;
        }

        cursorX = Math.max(0, Math.min(127, cursorX));
        cursorY = Math.max(0, Math.min(127, cursorY));
    }

    function draw() {
        cls(1);
        spr('cursor', cursorX - 3, cursorY - 3);
    }

    start({ sprites, sounds: {}, init, update, draw, target });
});
Adding a World with Camera
So far the cursor is locked to the 128x128 screen. To navigate a bigger world, we use camera(x, y) — it makes all drawing functions subtract that offset, so only the visible portion shows up on screen. The cursor position now tracks world coordinates and can go past 0–127.
The critical pattern is two-phase drawing. First, set camera() and draw all world objects. Then reset to camera(0, 0) and draw the cursor by converting world coordinates to screen coordinates (subtract the camera offset):
const worldWidth = 256;
const worldHeight = 192;
let camX = 0;
let camY = 0;

// inside draw()
camera(camX, camY);
rectfill(0, 0, worldWidth, worldHeight, 3);
// ...draw world objects here...

camera(0, 0);
spr('cursor', cursorX - camX - 3, cursorY - camY - 3);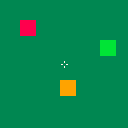
This coordinate distinction — world vs screen — is the most important concept. Use world coordinates for game logic and collision detection. Only convert to screen coordinates when drawing overlays like the cursor.
Scrolling the Camera
When the cursor's screen position gets close to an edge, and there's more world to see, the camera should follow. We convert world position to screen position with screenX = cursorX - camX, then check against a threshold. Clamp the camera so it never shows past the world boundaries:
// inside update(), after moving the cursor
const threshold = 10;
const screenX = cursorX - camX;
const screenY = cursorY - camY;

if (screenX < threshold && camX > 0) {
    camX -= speed;
}
if (screenX > 127 - threshold && camX < worldWidth - 128) {
    camX += speed;
}
if (screenY < threshold && camY > 0) {
    camY -= speed;
}
if (screenY > 127 - threshold && camY < worldHeight - 128) {
    camY += speed;
}
Handling Clicks
We use btnp('z') or btnp('Enter') as the action button — btnp() returns true only on the first frame of a press, so you get one action per tap. boxesCollide checks if the cursor (as a tiny 2x2 box at its center) overlaps a tile (16x16 box). Both positions are in world coordinates, so the comparison works directly — no camera conversion needed:
const tiles = [
    { x: 40, y: 40, color: 8 },
    { x: 80, y: 60, color: 9 },
    { x: 160, y: 100, color: 11 },
    { x: 200, y: 140, color: 12 },
];

// inside update()
if (btnp('z') || btnp('Enter')) {
    for (const tile of tiles) {
        if (
            boxesCollide(
                [cursorX - 1, cursorY - 1, 2, 2],
                [tile.x, tile.y, 16, 16],
            )
        ) {
            tile.color = tile.color === 7 ? 8 : 7;
        }
    }
}
Tip: Always use world coordinates for collision checks. Only convert to screen coordinates when drawing.
Putting It All Together
Here's everything combined: a 256x192 world with colored tiles, a keyboard-driven cursor, camera scrolling, and click detection. Arrow keys to move, Z or Enter to toggle tile colors:
engine.scope(
    ({ start, cls, spr, btn, btnp, cursor, camera, rectfill, boxesCollide }) => {
        const sprites = {
            cursor: [
                -1, -1, -1,  7, -1, -1, -1, -1,
                -1, -1, -1,  7, -1, -1, -1, -1,
                -1, -1, -1, -1, -1, -1, -1, -1,
                 7,  7, -1, -1, -1,  7,  7, -1,
                -1, -1, -1, -1, -1, -1, -1, -1,
                -1, -1, -1,  7, -1, -1, -1, -1,
                -1, -1, -1,  7, -1, -1, -1, -1,
                -1, -1, -1, -1, -1, -1, -1, -1,
            ],
        };

        const worldW = 256,
            worldH = 192,
            speed = 2,
            edge = 10;
        let cx = 64,
            cy = 64,
            camX = 0,
            camY = 0;
        const tiles = [
            { x: 40, y: 40, color: 8 },
            { x: 80, y: 60, color: 9 },
            { x: 160, y: 100, color: 11 },
            { x: 200, y: 140, color: 12 },
        ];

        function init() {
            cursor(false);
        }

        function update() {
            if (btn('ArrowLeft')) {
                cx -= speed;
            }
            if (btn('ArrowRight')) {
                cx += speed;
            }
            if (btn('ArrowUp')) {
                cy -= speed;
            }
            if (btn('ArrowDown')) {
                cy += speed;
            }
            cx = Math.max(0, Math.min(worldW, cx));
            cy = Math.max(0, Math.min(worldH, cy));

            const sx = cx - camX,
                sy = cy - camY;
            if (sx < edge && camX > 0) {
                camX -= speed;
            }
            if (sx > 127 - edge && camX < worldW - 128) {
                camX += speed;
            }
            if (sy < edge && camY > 0) {
                camY -= speed;
            }
            if (sy > 127 - edge && camY < worldH - 128) {
                camY += speed;
            }

            if (btnp('z') || btnp('Enter')) {
                for (const t of tiles) {
                    if (
                        boxesCollide(
                            [cx - 1, cy - 1, 2, 2],
                            [t.x, t.y, 16, 16],
                        )
                    ) {
                        t.color = t.color === 7 ? 8 : 7;
                    }
                }
            }
        }

        function draw() {
            cls(1);
            camera(camX, camY);
            rectfill(0, 0, worldW, worldH, 3);
            for (const t of tiles) {
                rectfill(t.x, t.y, t.x + 16, t.y + 16, t.color);
            }
            camera(0, 0);
            spr('cursor', cx - camX - 3, cy - camY - 3);
        }

        start({ sprites, sounds: {}, init, update, draw, target });
    },
);
Going Further
- Speed zones — move faster when holding a modifier key (e.g.,
btn('x')for a speed boost), handy for large worlds - Hover feedback — change the cursor sprite or an object's color when the cursor is over it
- Menu navigation — use
btnp('ArrowUp')/btnp('ArrowDown')to snap between items in a list instead of free movement - Screen-space UI — draw HUD elements after resetting the camera so they stay fixed while the world scrolls