How to Build a Monster-Catching RPG
There's something about monster-catching RPGs that hooks you immediately — walking through tall grass, not knowing what you'll run into, weakening a creature and hoping the catch lands. We're going to build one. The engine gives us everything we need: tilemaps, sprite flags, camera scrolling, keyboard input, and text rendering. By the end we'll have a scrolling overworld, random encounters, turn-based combat with HP bars, a catch mechanic with risk-reward probability, and a party of up to three monsters.
This builds on the grid-aligned movement pattern from the Top-Down Adventure tutorial. If you haven't worked through that one, it covers world building, tile collision, and camera scrolling in detail. We'll move through those parts quickly here and focus on what makes JRPGs unique — encounters, combat, catching, and party management.
The Overworld
Every RPG starts with a world to explore. We need four tile types — grass, path, tree, and wall — and the tilemap system to arrange them into a village surrounded by wilderness.
Each sprite carries a flags array. Flag 0 means solid — trees and walls use it to block movement. Flag 1 means encounter zone — that's how we mark grass tiles where wild monsters can appear. Path tiles have both flags off, making them safe to walk on.
For the sprites: grass is dark green (3) with bright green (11) accents scattered around. Paths are brown (4) with peach (15) specks. Trees get a green canopy over a brown trunk, and walls use the same dark grey (5) brick pattern from the top-down adventure tutorial.
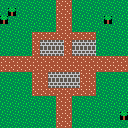
buildWorld fills a 24×24 grid with grass, borders it with trees, places a village of path tiles in the center with a few wall buildings, and runs paths out in each direction. Scattered trees in the grass break up the open space:
const sprites = {
    grass: [
        [
            3, 3, 11, 3, 3, 3, 3, 3,
            3, 3, 3, 3, 3, 11, 3, 3,
            3, 11, 3, 3, 3, 3, 3, 11,
            3, 3, 3, 11, 3, 3, 3, 3,
            3, 3, 3, 3, 3, 3, 11, 3,
            11, 3, 3, 3, 3, 3, 3, 3,
            3, 3, 3, 3, 11, 3, 3, 3,
            3, 3, 11, 3, 3, 3, 3, 11,
        ],
        [false, true, false, false, false, false, false, false],
    ],
    path: [
        [
            4, 4, 4, 4, 4, 4, 4, 4,
            4, 15, 4, 4, 4, 4, 15, 4,
            4, 4, 4, 4, 4, 4, 4, 4,
            4, 4, 4, 15, 4, 4, 4, 4,
            4, 4, 4, 4, 4, 4, 4, 4,
            4, 4, 4, 4, 4, 15, 4, 4,
            4, 15, 4, 4, 4, 4, 4, 4,
            4, 4, 4, 4, 4, 4, 4, 4,
        ],
        [false, false, false, false, false, false, false, false],
    ],
    tree: [
        [
            -1, 3, 11, 3, 3, 11, 3, -1,
            3, 11, 3, 11, 11, 3, 11, 3,
            3, 3, 11, 3, 3, 11, 3, 3,
            -1, 3, 3, 11, 11, 3, 3, -1,
            -1, -1, -1, 4, 4, -1, -1, -1,
            -1, -1, -1, 4, 4, -1, -1, -1,
            -1, -1, -1, 4, 4, -1, -1, -1,
            -1, -1, -1, 4, 4, -1, -1, -1,
        ],
        [true, false, false, false, false, false, false, false],
    ],
    wall: [
        [
            5, 5, 5, 6, 5, 5, 5, 6,
            5, 5, 5, 6, 5, 5, 5, 6,
            6, 6, 6, 6, 6, 6, 6, 6,
            5, 6, 5, 5, 5, 6, 5, 5,
            5, 6, 5, 5, 5, 6, 5, 5,
            6, 6, 6, 6, 6, 6, 6, 6,
            5, 5, 5, 6, 5, 5, 5, 6,
            5, 5, 5, 6, 5, 5, 5, 6,
        ],
        [true, false, false, false, false, false, false, false],
    ],
};

function buildWorld() {
    for (let y = 0; y < MAP_H; y++) {
        for (let x = 0; x < MAP_W; x++) {
            mset(x, y, 'grass');
        }
    }

    for (let x = 0; x < MAP_W; x++) {
        mset(x, 0, 'tree');
        mset(x, MAP_H - 1, 'tree');
    }
    for (let y = 0; y < MAP_H; y++) {
        mset(0, y, 'tree');
        mset(MAP_W - 1, y, 'tree');
    }

    // village center
    for (let y = 8; y <= 15; y++) {
        for (let x = 8; x <= 15; x++) {
            mset(x, y, 'path');
        }
    }

    // buildings
    for (let y = 9; y <= 10; y++) {
        for (let x = 9; x <= 11; x++) mset(x, y, 'wall');
    }
    for (let y = 9; y <= 10; y++) {
        for (let x = 13; x <= 15; x++) mset(x, y, 'wall');
    }
    for (let y = 13; y <= 14; y++) {
        for (let x = 10; x <= 13; x++) mset(x, y, 'wall');
    }

    // paths out of village
    for (let y = 1; y <= 7; y++) { mset(11, y, 'path'); mset(12, y, 'path'); }
    for (let y = 16; y <= 22; y++) { mset(11, y, 'path'); mset(12, y, 'path'); }
    for (let x = 1; x <= 7; x++) { mset(x, 11, 'path'); mset(x, 12, 'path'); }
    for (let x = 16; x <= 22; x++) { mset(x, 11, 'path'); mset(x, 12, 'path'); }

    // scattered trees
    mset(3, 3, 'tree'); mset(5, 5, 'tree'); mset(7, 3, 'tree');
    mset(4, 6, 'tree'); mset(18, 3, 'tree'); mset(20, 5, 'tree');
    mset(17, 6, 'tree'); mset(21, 2, 'tree'); mset(3, 18, 'tree');
    mset(6, 20, 'tree'); mset(4, 21, 'tree'); mset(19, 18, 'tree');
    mset(21, 20, 'tree'); mset(17, 21, 'tree');
}
The camera starts centered on the village. At 24×24 tiles and 8 pixels each, the world is 192×192 pixels — bigger than the 128×128 canvas. We'll need scrolling once the player starts moving.
Walking Around
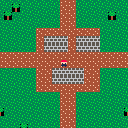
Time for a player character. We need four directional sprites — the trainer gets a red (8) hat, peach (15) skin, dark blue (1) body, and brown (4) boots. Distinct enough to spot against every terrain type.
Movement is grid-aligned. tileX/tileY track the logical grid position, and px/py track the pixel position for rendering. Each frame, px and py lerp toward the target tile at a fixed speed. When they arrive, the player can move again.
Before starting a move, we check the destination tile with fget — if flag 0 is set, it's solid and the move gets blocked:
function isSolid(x, y) {
    const tile = mget(x, y);
    return tile && fget(tile, 0);
}
The camera follows the player and clamps to the world bounds so it never shows empty space:
camX = Math.max(0, Math.min(MAP_W * 8 - CANVAS, px - 60));
camY = Math.max(0, Math.min(MAP_H * 8 - CANVAS, py - 60));
We check horizontal and vertical input separately. If both axes have input at the same time, the most recently pressed one wins — lastAxis tracks which direction was pressed alone, and the newer one takes priority. It prevents diagonal movement on a grid without feeling sluggish:
let dx = 0, dy = 0;
if (btn('ArrowLeft') || btn('a')) dx = -1;
else if (btn('ArrowRight') || btn('d')) dx = 1;
if (btn('ArrowUp') || btn('w')) dy = -1;
else if (btn('ArrowDown') || btn('s')) dy = 1;

if (dx !== 0 && dy === 0) lastAxis = 'h';
if (dy !== 0 && dx === 0) lastAxis = 'v';
if (dx !== 0 && dy !== 0) {
    if (lastAxis === 'h') dx = 0;
    else dy = 0;
}
This uses the same grid-aligned movement pattern from the Top-Down Adventure tutorial. If this is your first time seeing it, that tutorial covers the details.
Random Encounters
Walking works, but the grass is harmless. That's not very JRPG. We need random encounters — a chance of triggering a battle every time the player steps on a grass tile. That means two things: a way to detect encounter zones, and a state machine to switch between overworld and battle.
The state machine is a single mode variable — 'overworld' or 'battle'. Each mode has its own update and draw logic. The overworld freezes completely during a battle.
After the player finishes a step, we check flag 1 on the current tile. Grass has it set to true, path and wall don't. If we're on an encounter tile, we roll rnd(1) < 0.15 — a 15% chance per step:
function isEncounterZone(x, y) {
    const tile = mget(x, y);
    return tile && fget(tile, 1);
}

// after the player finishes a step:
if (px === tx && py === ty) {
    moving = false;

    if (isEncounterZone(tileX, tileY) && rnd(1) < 0.15) {
        startEncounter();
        return;
    }
}
When an encounter triggers, we pick a random monster from a pool and flip to battle mode. Each monster is a plain object — name, sprite, HP, attack, defense. We copy it with spread so the template stays clean for the next encounter:
const monsterPool = [
    { name: 'Flamepup', sprite: 'flamepup', maxHp: 20, attack: 8, defense: 3 },
];

function startEncounter() {
    const template = monsterPool[Math.floor(rnd(monsterPool.length))];
    wildMonster = { ...template, hp: template.maxHp };
    mode = 'battle';
}
For now the battle screen shows the monster's sprite, an "A wild X appeared!" message, and Z to dismiss. We'll add real combat next.

The encounter rate of 15% per step feels right for a small demo world. In a full game you'd tune this per area — 5% for short routes, 20% for deep caves.
Turn-Based Combat
The placeholder battle screen dismisses on Z. Let's make it do something. We need a menu, damage calculation, turns, and win/lose conditions.
Battle gets its own sub-states: 'menu', 'message', and transitions for win/lose/escape. The top-level mode still switches between 'overworld' and 'battle', but inside the battle, battleState controls what's happening.
The menu starts with two options: FIGHT and RUN. An arrow cursor moves with Up/Down, Z selects. The cursor wraps so pressing Down on the last option jumps back to the first:
const menuOptions = ['FIGHT', 'RUN'];

if (btnp('ArrowUp') || btnp('w'))
    menuCursor = (menuCursor + menuOptions.length - 1) % menuOptions.length;
if (btnp('ArrowDown') || btnp('s'))
    menuCursor = (menuCursor + 1) % menuOptions.length;
The damage formula is straightforward: attacker's attack minus defender's defense, plus a random roll between -2 and +2, floored at 1. Stat differences matter — a high-defense monster shrugs off hits — but you always deal at least 1:
function calcDamage(atk, def) {
    return Math.max(1, atk - def + randomIntegerBetween(-2, 2));
}
FIGHT deals damage to the wild monster, shows the result, then the enemy retaliates with the same formula. RUN has a 60% success chance — fail and the enemy gets a free hit. The battle ends when either side's HP hits 0. Losing resets your HP and warps you back to the village:
if (menuOptions[menuCursor] === 'FIGHT') {
    const dmg = calcDamage(playerAtk, wildMonster.defense);
    wildMonster.hp = Math.max(0, wildMonster.hp - dmg);
    showMessage('You deal ' + dmg + ' damage!', 40);
    if (wildMonster.hp <= 0) {
        nextBattleState = 'endWin';
    } else {
        nextBattleState = 'enemyTurn';
    }
} else if (menuOptions[menuCursor] === 'RUN') {
    if (rnd(1) < 0.6) {
        showMessage('Got away safely!', 40);
        nextBattleState = 'endReturn';
    } else {
        showMessage("Can't escape!", 40);
        nextBattleState = 'runFail';
    }
}
The showMessage / nextBattleState pattern is the glue here. Each message displays for a set number of frames, then the next state fires. No nested callbacks — the timer drives the whole sequence.

HP Bars and Battle UI
Numbers for HP get the job done, but they don't feel like a real JRPG. We need visual HP bars, a proper battle layout, and some screen effects.
An HP bar is two rectfill calls layered on top of each other — a dark grey (5) background at full width, and a colored fill whose width scales with the HP percentage. The fill color shifts at thresholds: green (11) above 50%, yellow (10) at 25-50%, red (8) below 25%:
function hpBarColor(hp, maxHp) {
    const pct = hp / maxHp;
    if (pct > 0.5) return 11;
    if (pct > 0.25) return 10;
    return 8;
}

function drawHpBar(x, y, hp, maxHp) {
    const fillW = Math.floor((hp / maxHp) * HP_BAR_W);
    rectfill(x, y, x + HP_BAR_W, y + 3, 5);
    if (fillW > 0)
        rectfill(x, y, x + fillW, y + 3, hpBarColor(hp, maxHp));
}
We put the enemy's info top-left with its sprite to the right, and the player's info lower-left with their sprite below. The diagonal arrangement gives each side room on the 128×128 canvas.
Two effects sell the combat feel. First, a battle transition — when an encounter triggers, the screen flashes between black and white for a few frames before the battle UI appears:
function startEncounter() {
    const template = monsterPool[Math.floor(rnd(monsterPool.length))];
    wildMonster = { ...template, hp: template.maxHp };
    mode = 'transition';
    transitionTimer = 12;
}

// in draw:
if (mode === 'transition') {
    cls(transitionTimer % 2 === 0 ? 0 : 7);
    return;
}
Second, a hit flash. When damage lands, the target blinks invisible for a few frames — flashTimer counts down, and on even frames the sprite is hidden:
function startFlash(target) {
    flashTarget = target;
    flashTimer = 12;
}

// in drawBattle:
const enemyVisible = !(flashTarget === 'enemy'
    && flashTimer > 0 && Math.floor(flashTimer / 2) % 2 === 0);
if (enemyVisible) spr(wildMonster.sprite, 92, 8);
Catching Monsters
Fighting and running works, but the whole point of the genre is catching things. We need a party array, a CATCH option in the battle menu, and a catch formula that rewards weakening the target.
The player's stats now come from the lead monster in their party instead of flat variables. party[0] is the active monster in battle:
let party = [
    { name: 'Flamepup', sprite: 'flamepup', hp: 25, maxHp: 25, attack: 8, defense: 4 },
];

function lead() {
    return party[0];
}
The menu expands to three options: FIGHT, CATCH, RUN. The catch formula is linear with the enemy's remaining HP — 30% at full health, close to 80% at 1 HP:
const chance = 0.3 + 0.5 * (1 - wildMonster.hp / wildMonster.maxHp);
if (rnd(1) < chance) {
    showMessage('Got ' + wildMonster.name + '!', 60);
    nextBattleState = 'catchSuccess';
} else {
    showMessage('It broke free!', 40);
    nextBattleState = 'catchFail';
}
On success, the wild monster gets copied into the party with full HP restored. The party caps at 3 — try to catch when full and you get a "Party is full!" message. On failure, the enemy gets a free attack, same as a failed run.
The overworld now shows a party count HUD in the corner using creset() to draw in screen space:
creset();
text('Party: ' + party.length + '/' + PARTY_MAX, 2, 2, 7);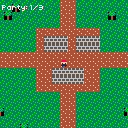
The catch formula creates a risk-reward decision: weaken the monster for better odds, but risk knocking it out. This tension is what makes the catch mechanic feel so good.
Party Management
Catching monsters is pointless if you can't switch between them. We need a third game mode — 'partyMenu' — accessible by pressing X in the overworld.
The party menu shows each monster as a row: sprite icon, name, a mini HP bar, and HP numbers. The lead monster gets a [LEAD] label. A cursor moves with Up/Down, and pressing Z on any non-lead monster swaps it to the front:
function updatePartyMenu() {
    if (btnp('x') || btnp('Escape')) {
        mode = 'overworld';
        return;
    }

    if (btnp('ArrowUp') || btnp('w'))
        partyCursor = (partyCursor + party.length - 1) % party.length;
    if (btnp('ArrowDown') || btnp('s'))
        partyCursor = (partyCursor + 1) % party.length;

    if ((btnp('z') || btnp(' ')) && partyCursor !== 0) {
        const temp = party[0];
        party[0] = party[partyCursor];
        party[partyCursor] = temp;
        partyCursor = 0;
    }
}
Drawing it is straightforward — loop through the party, space out each row for the sprite and HP bar:
function drawPartyMenu() {
    cls(0);
    text('PARTY', 48, 4, 7);

    for (let i = 0; i < party.length; i++) {
        const y = 20 + i * 30;
        const m = party[i];

        if (i === partyCursor) text('>', 4, y + 4, 10);

        spr(m.sprite, 14, y);
        text(m.name, 28, y, 7);
        drawMiniHpBar(28, y + 10, m.hp, m.maxHp);
        text(m.hp + '/' + m.maxHp, 28, y + 16, 6);

        if (i === 0) text('[LEAD]', 80, y, 10);
    }

    text('Z=swap  X=close', 12, 118, 6);
}
Opening the party menu from the overworld is one line — check for X before processing movement:
if (btnp('x') || btnp('Escape')) {
    mode = 'partyMenu';
    partyCursor = 0;
    return;
}
The lead monster's stats are what get used in battle, so swapping lets you pick the right matchup — a tanky monster against a heavy hitter, or a glass cannon to finish off a weakened target.
Healing and Monster Variety
One monster species isn't much of an ecosystem. The complete game has five, each using distinct palette regions so they're recognizable at 8×8:
- Flamepup — red (8) / orange (9), high attack, low defense
- Shellbit — blue (12) / grey (6), low attack, high defense
- Zapfin — yellow (10) / white (7), balanced stats
- Mossgrowl — green (3) / bright green (11), high HP, low attack
- Shadowclaw — purple (2) / lavender (13), glass cannon (high attack, low HP)
Different areas of grass have different encounter tables. North route gets Zapfin and Mossgrowl, south route gets Shellbit and Shadowclaw. A helper picks the right pool based on the player's Y position:
const northPool = [
    { name: 'Zapfin', sprite: 'zapfin', maxHp: 22, attack: 7, defense: 5 },
    { name: 'Mossgrowl', sprite: 'mossgrowl', maxHp: 30, attack: 5, defense: 4 },
];

const southPool = [
    { name: 'Shellbit', sprite: 'shellbit', maxHp: 25, attack: 5, defense: 7 },
    { name: 'Shadowclaw', sprite: 'shadowclaw', maxHp: 16, attack: 10, defense: 3 },
];

function getEncounterPool() {
    if (tileY < 8) return northPool;
    if (tileY > 15) return southPool;
    return rnd(1) < 0.5 ? northPool : southPool;
}
Battles wear you down, so the village has a healer NPC. Walk up and press Z to fully restore all party monsters and refill potions to 3. The healer sprite gets a white (7) hat with red (8) cross accents — the universal "I fix things" look:
if (btnp('z') || btnp(' ')) {
    if (isAdjacentToHealer()) {
        for (const m of party) m.hp = m.maxHp;
        potions = 3;
        mode = 'healMessage';
        messageText = 'Monsters healed!';
        messageTimer = 60;
        return;
    }
}
Potions are the fourth battle menu option. The menu expands from a vertical list to a 2×2 grid — FIGHT and CATCH on top, HEAL and RUN on the bottom — navigated with all four arrow keys. Each potion restores 10 HP to the lead monster, then the enemy gets a turn:
const menuGrid = [['FIGHT', 'CATCH'], ['HEAL', 'RUN']];
// when HEAL is selected:
if (potions <= 0) {
showMessage('No potions left!', 40);
nextBattleState = 'backToMenu';
} else {
potions--;
const healed = Math.min(10, lead().maxHp - lead().hp);
lead().hp += healed;
showMessage('Healed ' + healed + ' HP!', 40);
nextBattleState = 'enemyTurn';
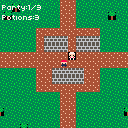
}The overworld HUD updates to show both party count and potion count. Blacking out resets potions to 3 as well — the healer's kindness extends to unconscious trainers.
Complete Example
Everything together now. The full script has a 24×24 scrolling world with a village and two grass routes, five monster species with unique sprites, grid-aligned movement with wall collision and camera, random encounters with a battle transition flash, turn-based combat with HP bars and hit flash, a 2×2 battle menu (Fight/Catch/Heal/Run), a party of up to three monsters switchable via the party menu (X key), potions (limited supply, restored by the healer NPC), and blackout recovery that warps you back to the village.
Going Further
- Experience points and leveling — track XP per monster, increase stats at thresholds, show a level-up animation after battle
- Monster evolution — when a monster reaches a certain level, swap its sprite and boost its stats, with a flashy transition effect
- Move sets — give each monster 2-4 named attacks with different power values instead of a single "Fight" option, selectable from a sub-menu
- Status effects — poison (damage each turn), sleep (skip turn), paralyze (50% chance to skip), with visual indicators on the HP bar
- Larger world with multiple areas — use
mclearand rebuild the tilemap when the player enters a door or route exit, each area with its own encounter table - Wild monster sprites in the overworld — place visible monsters on the map that trigger battles on contact instead of (or alongside) random encounters
- Save/load system — serialize party, position, and potion count to a cookie or localStorage (see the Save/Load tutorial)