How to Add Screen Shake & View Bobbing
A static camera feels lifeless. Walk around any first-person game and you'll notice two things you barely think about: the view gently bobs with each step, and the screen jolts when you slam into something. These tiny effects turn a tech demo into something that feels physical.
We're adding both to the raycaster from the raycasting tutorial. We'll offset the rendering center with a sine wave for view bobbing, then use the engine's camera() function for screen shake on wall collisions. The techniques work in any first-person project, but the raycaster makes them easy to see.
The Starting Point
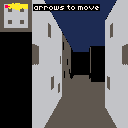
Here's the raycaster we'll be modifying. It's the same DDA renderer from the raycasting tutorial — an 8×8 map, textured walls with distance shading, a minimap on the left, and arrow-key movement with collision detection. Walk around and get a feel for how rigid the camera is:
The key line for both effects is the wall-strip vertical position. Right now every column is centered at viewH / 2:
const stripeH = Math.floor(viewH / perpDist);
const drawStart = Math.max(0, Math.floor(viewH / 2 - stripeH / 2));
const drawEnd = Math.min(viewH, Math.floor(viewH / 2 + stripeH / 2));
The ceiling and floor split at the same fixed midpoint:
rectfill(viewX, 0, viewX + viewW, viewH / 2, 1);
rectfill(viewX, viewH / 2, viewX + viewW, viewH, 5);
Both effects work by moving that midpoint. View bobbing moves it smoothly with a sine wave. Screen shake moves it randomly with decay. Let's start with the bob.
View Bobbing
View bobbing comes down to three things: a phase that advances while the player moves, a sine wave that turns the phase into a vertical offset, and a way to apply that offset to the rendering.
Add the bobbing state alongside the other player variables:
let bobPhase = 0;
const BOB_SPEED = 0.15;
const BOB_AMOUNT = 2;
let bobOffset = 0;
bobPhase is an angle in radians that feeds into Math.sin(). It advances by BOB_SPEED every frame the player is moving. BOB_AMOUNT controls how many pixels the view shifts at peak. Two pixels is subtle enough to feel natural without being distracting.
At the end of update(), advance the phase when moving and let it decay when stopped:
const moving = btn('ArrowUp') || btn('ArrowDown');
if (moving) {
    bobPhase += BOB_SPEED;
} else {
    bobPhase *= 0.9;
}
bobOffset = Math.sin(bobPhase) * BOB_AMOUNT;
The *= 0.9 decay matters. Without it, stopping mid-stride would freeze the bob at whatever offset it was at, leaving the view tilted. The decay smoothly returns it to center.
Let's apply bobOffset to the rendering. The ceiling/floor split shifts with the bob:
const horizonY = Math.floor(viewH / 2 + bobOffset);
rectfill(viewX, 0, viewX + viewW, horizonY, 1);
rectfill(viewX, horizonY, viewX + viewW, viewH, 5);
Inside the column loop, use center instead of viewH / 2 for the wall strip position:
const center = viewH / 2 + bobOffset;
const drawStart = Math.max(0, Math.floor(center - stripeH / 2));
const drawEnd = Math.min(viewH, Math.floor(center + stripeH / 2));
The texture coordinate calculation also needs the shifted center so the texture doesn't tear:
let texPos = (drawStart - center + stripeH / 2) * texStep;Why not use camera() for this? Two reasons. First, camera() offsets everything — including the minimap, which shouldn't bob. Second, camera() floors its arguments to integers, so the sine wave would stutter at pixel boundaries instead of flowing smoothly. Offsetting the render center directly avoids both.

Screen Shake
Screen shake is the opposite philosophy from view bobbing. Where bobbing is smooth and only affects the 3D view, shake should be rough and jolt the entire frame — minimap, walls, everything. That makes camera() the right tool here.
Add the shake state:
let shakeAmount = 0;
const SHAKE_DECAY = 0.85;
const SHAKE_STRENGTH = 3;
shakeAmount starts at zero and gets set to SHAKE_STRENGTH when the player bumps a wall. Each frame it multiplies by SHAKE_DECAY, so it falls off quickly: 3 → 2.55 → 2.17 → 1.84 → ... → 0. The 0.85 decay gives about 10 frames of visible shake before it fades out.
The raycaster already has collision detection that tests X and Y movement separately. Add a bumped flag to detect when the player walks into a wall:
let bumped = false;

if (btn('ArrowUp')) {
    const nx = px + Math.cos(pa) * moveSpeed;
    const ny = py + Math.sin(pa) * moveSpeed;

    if (map[Math.floor(py)][Math.floor(nx)] === 0) px = nx;
    else bumped = true;
    if (map[Math.floor(ny)][Math.floor(px)] === 0) py = ny;
    else bumped = true;
}

if (bumped) shakeAmount = SHAKE_STRENGTH;
Let's apply the shake at the start of draw(). Reset the camera, clear the screen, then set the new offset:
creset();
cls(0);

if (shakeAmount > 0.5) {
    camera(
        (rnd(2) - 1) * shakeAmount,
        (rnd(2) - 1) * shakeAmount,
    );
    shakeAmount *= SHAKE_DECAY;
}
The creset() before cls() is important. The camera offset from the previous frame is still active when draw() starts. If you clear the screen while the camera is offset, it leaves a strip of uncleaned pixels at the edge. Resetting first ensures a clean slate.
rnd(2) - 1 gives a random value between -1 and 1, scaled by shakeAmount. Each frame gets a different random offset, creating the jitter. Once shakeAmount drops below 0.5, the shake stops — at that scale it's less than a pixel and wouldn't be visible.
If you draw any fixed UI — score, health, instructions — call creset() before those draws so they stay put.
We need camera, creset, and rnd from the engine scope — add them to the destructure at the top.

Going Further
- Horizontal sway — add a second sine wave that shifts wall columns left and right, offset from the vertical bob by a quarter cycle. This gives a more pronounced walking rhythm, like the player's shoulders are swaying.
- Damage shake — bind a key to simulate taking damage with a stronger shake. Use a higher
SHAKE_STRENGTHand a slowerSHAKE_DECAYfor a longer, more violent jolt. - Directional shake — instead of random X and Y offsets, shake along the axis of the wall that was hit. The
sidevariable already tells you which face the player bumped — use it to shake horizontally for X-face collisions and vertically for Y-face. - Trauma stacking — instead of resetting
shakeAmountto a fixed value on each bump, add to it. Square the accumulated trauma for the final shake magnitude. Rapid bumps compound into a bigger shake — this is the approach Vlambeer popularized. - Sprint bob — increase
BOB_SPEEDandBOB_AMOUNTwhen the player holds a run key. A faster, wider bob sells the difference between walking and sprinting. - Weapon sway — if you add a weapon sprite at the bottom of the screen, offset it opposite to the bob direction. This counter-sway effect makes the weapon feel like it has its own weight.