How to Build Levels From Pixel Art
Every raycaster tutorial so far has used hand-coded 2D arrays for level maps. That's fine for small demos, but try designing a 16x16 dungeon by typing ones and zeroes. You'll want to quit before the first hallway is done.
Here's the thing — the engine already understands flat arrays of color indices. That's how sprites work. So what if we used a sprite as a map, where each pixel color represents a different tile type? Paint a tiny image, and the code reads it as a level.
We're also going to tackle a second limitation: every wall, poster, and prop so far has been a single 8x8 sprite. That's 64 pixels of detail. By compositing multiple sprites into larger textures, we can double or quadruple the fidelity without changing the engine.
You'll want to be comfortable with the raycasting fundamentals from the earlier tutorials, especially Poster Decals and Props. Everything here builds directly on those patterns.
The Starting Point
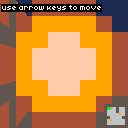
Here's a familiar raycaster — 8x8 map, textured walls, poster decals, and barrel props. The map is a hand-coded 2D array, and each game element is defined separately:
const MapSize = 8;

const Map = [
    [1, 1, 1, 1, 1, 1, 1, 1],
    [1, 0, 0, 0, 1, 0, 0, 1],
    [1, 0, 0, 0, 1, 0, 0, 1],
    [1, 0, 0, 0, 0, 0, 0, 1],
    [1, 1, 0, 0, 0, 0, 1, 1],
    [1, 0, 0, 0, 0, 0, 0, 1],
    [1, 0, 0, 0, 0, 0, 0, 1],
    [1, 1, 1, 1, 1, 1, 1, 1],
];

const Decals = [
    { mx: 4, my: 1, side: 1 },
    { mx: 1, my: 4, side: 0 },
];

const Props = [
    { x: 2.5, y: 1.5 },
    { x: 5.5, y: 3.5 },
    { x: 2.5, y: 5.5 },
];

let px = 1.5;
let py = 1.5;
The map array, decal list, prop list, and spawn coordinates all have to stay in sync manually. Move a wall and you might need to update a decal position to match. Add a room and you're figuring out new prop coordinates by hand.
For 8x8 this is manageable. For anything bigger, it gets painful fast.
Painting a Map Sprite
A sprite is a flat array of color indices. A map is a 2D grid of tile types. Those are the same thing — one pixel per tile, one color per type. So let's define a "map sprite" where each color index means something:
| Color | Meaning |
|---|---|
| 0 | Empty floor |
| 1 | Wall |
| 8 | Player spawn |
| 9 | Prop |
| 11 | Decal wall |
Here's the map sprite for that same 8x8 level:
const mapSprite = [
    1,  1,  1,  1,  1,  1,  1,  1,
    1,  8,  0,  9,  1,  0,  0,  1,
    1,  0,  0,  0, 11,  0,  0,  1,
    1,  0,  0,  0,  0,  0,  9,  1,
    1, 11,  0,  0,  0,  0,  1,  1,
    1,  0,  0,  0,  0,  0,  0,  1,
    1,  0,  0,  9,  0,  0,  0,  1,
    1,  1,  1,  1,  1,  1,  1,  1,
];
Everything's in one place. Walls, props, decals, and the spawn point are all visible in the same grid. Let's write a function that reads this sprite and builds all the game data from it:
function parseMapSprite(sprite, size) {
    const map = [];
    const props = [];
    const decals = [];
    let spawnX = 1.5, spawnY = 1.5;

    for (let y = 0; y < size; y++) {
        map[y] = [];
        for (let x = 0; x < size; x++) {
            const color = sprite[y * size + x];
            switch (color) {
                case 0: map[y][x] = 0; break;
                case 1: map[y][x] = 1; break;
                case 8:
                    map[y][x] = 0;
                    spawnX = x + 0.5;
                    spawnY = y + 0.5;
                    break;
                case 9:
                    map[y][x] = 0;
                    props.push({ x: x + 0.5, y: y + 0.5 });
                    break;
                case 11:
                    map[y][x] = 1;
                    decals.push({
                        mx: x, my: y,
                        side: x === 0 || sprite[y * size + (x - 1)] === 0 ? 0 : 1,
                    });
                    break;
                default: map[y][x] = 0; break;
            }
        }
    }
    return { map, props, decals, spawnX, spawnY };
}
We loop through every pixel. Walls and floors go straight into the map array. Spawn (color 8) records the player's starting position and leaves floor underneath. Props (color 9) add an entry with world coordinates at the center of that cell. Decal walls (color 11) place a wall and figure out which face the decal should appear on by checking whether the neighboring cell to the left is open.
One call replaces all the hand-coded data:
const { map: Map, props: Props, decals: Decals, spawnX, spawnY } =
parseMapSprite(mapSprite, MapSize);
let px = spawnX;
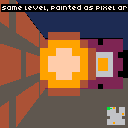
let py = spawnY;The result is visually identical to the previous version. Same walls, same props, same decals — but everything comes from a single source of truth.
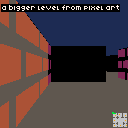
Designing a Bigger Level
Here's where it pays off. Let's scale up to a 16x16 map sprite — four times the area, with rooms connected by doorways, props scattered through the space, and decal walls marking points of interest:
const MapSize = 16;

const mapSprite = [
    1,  1,  1,  1,  1,  1,  1,  1,  1,  1,  1,  1,  1,  1,  1,  1,
    1,  8,  0,  0,  0,  1,  0,  0,  0,  0,  1,  0,  0,  0,  0,  1,
    1,  0,  0,  0,  0,  1,  0,  9,  0,  0,  1,  0,  0,  0,  0,  1,
    1,  0,  0,  9,  0,  0,  0,  0,  0,  0, 11,  0,  0,  9,  0,  1,
    1,  0,  0,  0,  0,  1,  0,  0,  0,  0,  1,  0,  0,  0,  0,  1,
    1,  1, 11,  0,  1,  1,  1,  0,  0,  1,  1,  1,  0, 11,  1,  1,
    1,  0,  0,  0,  0,  1,  0,  0,  0,  0,  0,  0,  0,  0,  0,  1,
    1,  0,  0,  0,  0,  0,  0,  0,  0,  0,  0,  0,  0,  0,  0,  1,
    1,  0,  9,  0,  0,  0,  0,  0,  0,  0,  0,  0,  0,  9,  0,  1,
    1,  0,  0,  0,  0,  0,  0,  0,  0,  0,  0,  0,  0,  0,  0,  1,
    1,  0,  0,  0,  0,  1,  0,  0,  0,  0,  0,  1,  0,  0,  0,  1,
    1,  1, 11,  0,  1,  1,  0,  0,  0,  0,  0,  1,  1,  0, 11,  1,
    1,  0,  0,  0,  0,  1,  0,  0,  0,  0,  0,  1,  0,  0,  0,  1,
    1,  0,  9,  0,  0,  0,  0,  0,  9,  0,  0,  0,  0,  0,  9,  1,
    1,  0,  0,  0,  0,  1,  0,  0,  0,  0,  0,  1,  0,  0,  0,  1,
    1,  1,  1,  1,  1,  1,  1,  1,  1,  1,  1,  1,  1,  1,  1,  1,
];
Try designing this by hand as a 2D array of [1,0,0,1,...] rows. Then try reading it back to figure out where the props are. The map sprite version is immediately legible — you can see the room shapes, doorways, and object placement at a glance.
The only code that changes is the constants. A 16x16 map needs a smaller minimap cell size (1 pixel per cell instead of 3) so it still fits in the corner:
const Cell = 1;
const MmX = 112;
const MmY = 112;
parseMapSprite doesn't change at all. Pass it a 256-element array and a size of 16 instead of 64 elements and 8, and it produces the same kinds of outputs — just more of them. That's the whole point: the level design scales, but the parsing code stays the same.
Look at the minimap in the corner. It's a direct mirror of the map sprite — each pixel corresponds to one value in the array. What you paint is what you get.
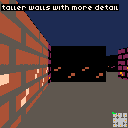
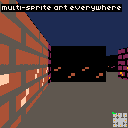
Multi-Sprite Wall Textures
Every wall texture so far has been an 8x8 flat array — 64 values, 8 pixels tall. That's enough to suggest a brick pattern, but not enough for real detail. What if we stacked two 8x8 sprites vertically into one 8x16 texture?
The data is just a longer array. An 8x8 texture has 64 elements. An 8x16 has 128 — top half followed by the bottom half:
const TallWallTexture = [
    // top 8 rows (first sprite)
    4, 4, 4, 5, 4, 4, 4, 4,
    4, 4, 4, 5, 4, 4, 4, 4,
    5, 5, 5, 5, 5, 5, 5, 5,
    4, 4, 4, 4, 4, 5, 4, 4,
    4, 4, 4, 4, 4, 5, 4, 4,
    5, 5, 5, 5, 5, 5, 5, 5,
    4, 4, 4, 5, 4, 4, 4, 4,
    4, 4, 4, 5, 4, 4, 4, 4,
    // bottom 8 rows (second sprite)
    5, 5, 5, 5, 5, 5, 5, 5,
    4, 4, 15, 4, 4, 5, 4, 4,
    4, 15, 4, 4, 4, 5, 4, 4,
    5, 5, 5, 5, 5, 5, 5, 5,
    4, 4, 4, 5, 4, 4, 15, 4,
    4, 4, 4, 5, 4, 15, 4, 4,
    5, 5, 5, 5, 5, 5, 5, 5,
    4, 4, 4, 4, 4, 5, 4, 4,
];
The bottom half has light-colored specks (color 15) that give the bricks a weathered look. We couldn't fit that detail into 8 rows.
The rendering loop needs two changes. First, the texture step size doubles because we're sampling 16 rows instead of 8:
const texStep = 16 / stripeH;Second, ty now ranges from 0 to 15 instead of 0 to 7. The index into the texture array stays ty * 8 + tx because the texture is still 8 pixels wide:
for (let sy = drawStart; sy < drawEnd; sy++) {
    const ty = Math.min(15, Math.floor(texPos));
    texPos += texStep;

    let color = TallWallTexture[ty * 8 + tx];
    if (color < 0) continue;

    // ...darken and draw as before
}
That's it. No engine changes, no new rendering pipeline — just a longer array and adjusted math. The walls now have twice the vertical detail.
Multi-Sprite Props and Posters
The same compositing trick works for posters and props. A 16x16 poster is four 8x8 sprites arranged in a 2x2 grid — 256 elements, 16 wide and 16 tall. The decal rendering samples from the larger texture by computing both coordinates at the higher resolution:
if (decal) {
    const ptx = Math.floor(wallHit * 16);
    const dc = LargePosterTexture[ty * 16 + ptx];
    if (dc >= 0) color = dc;
}
ty already ranges 0-15 from the tall wall sampling. The poster x-coordinate (ptx) maps the wall hit position to 16 columns instead of 8. The index is ty * 16 + ptx because the poster is 16 wide.
For props, an 8x16 sprite gives us a barrel that's taller than it is wide. The sprite data has 128 elements — 8 columns, 16 rows — with transparent pixels at the top so the barrel appears shorter than the walls:
const TallPropSprite = [
    -1, -1, -1, -1, -1, -1, -1, -1,
    -1, -1, -1, -1, -1, -1, -1, -1,
    -1, -1, -1, -1, -1, -1, -1, -1,
    -1, -1, -1, -1, -1, -1, -1, -1,
    -1, -1,  5,  4,  4,  5, -1, -1,
    -1,  5,  4,  9,  9,  4,  5, -1,
    -1,  4,  9,  4,  4,  9,  4, -1,
    -1,  5,  5,  5,  5,  5,  5, -1,
    -1,  4,  9,  4,  4,  9,  4, -1,
     4,  4,  9,  4,  4,  9,  4,  4,
     4,  4,  9,  4,  4,  9,  4,  4,
    -1,  4,  9,  4,  4,  9,  4, -1,
    -1,  5,  5,  5,  5,  5,  5, -1,
    -1,  4,  9,  4,  4,  9,  4, -1,
    -1,  5,  4,  4,  4,  4,  5, -1,
    -1, -1,  5,  5,  5,  5, -1, -1,
];
The billboard rendering for tall props needs two adjustments. First, we want the prop to sit on the ground instead of floating at eye level. We calculate where the floor is at that distance and anchor the bottom of the sprite there:
const wallH = Math.floor(128 / transformY);
const sprW = Math.floor(wallH / 2);
const sprH = Math.floor(wallH / 2);
const floorY = Math.floor(64 + wallH / 2);

const drawStartY = Math.max(0, floorY - sprH);
const drawEndY = Math.min(128, floorY);
Second, the texture y-coordinate maps into 16 rows instead of 8, and needs clamping to prevent a subtle edge artifact. When Math.floor gets a slightly negative value, it reads from the wrong texture row:
const ty = Math.min(15, Math.max(0, Math.floor(
    ((y - (floorY - sprH)) * 16) / sprH,
)));
The Math.max(0, ...) is the key fix. Without it, when the sprite width is odd, the first rendered column computes a fractional offset that goes slightly negative. Math.floor of -0.1 is -1, which reads element ty * 8 - 1 — the last pixel of the previous row. That produces thin garbage lines at the sprite edges. The same clamping applies to tx:
const tx = Math.min(7, Math.max(0, Math.floor(
    ((stripe - (screenX - sprW / 2)) * 8) / sprW,
)));
With pixel-art levels and multi-sprite textures, we've got a complete toolkit: paint a map sprite to design your world, then build detailed walls, posters, and props from composited sprites. All of it runs on the same raycaster — no engine changes needed.
Going Further
Here are a few directions you could take this:
Multiple wall types. The color legend only uses a handful of the 16 available palette indices. Assign colors 2, 3, and 4 to different wall textures and select the right array based on the map value during rendering. Stone walls, wood panels, metal plates — each gets its own color in the map sprite.
Animated textures. Store two or more versions of a wall texture and cycle between them on a timer. A torch that flickers between two states, or a sign that pulses between bright and dim — a bit of life goes a long way.
Layered detail sprites. Stack a base wall texture with a semi-transparent overlay for damage cracks, moss, or weather effects. Render the base first, then composite the overlay on top — any transparent pixel (-1) in the overlay lets the base texture show through.
External level editor. Tools like Aseprite or Piskel can export pixel art as flat arrays. Design your level visually in an editor, export the data, and paste it into your game code. The map sprite format maps directly to indexed-color image data.
Runtime level switching. Store multiple map sprites and call parseMapSprite() to swap levels on the fly. Combined with the techniques from the Scene and Level Management tutorial, you can build a multi-level game where each level is a single sprite.