How to Add Poster Decals & Props
The raycasting tutorial gave us textured walls, and we've since added fog, monsters, and multi-level scenes. But the hallways still feel bare. Every wall looks the same, and there's nothing on the floor to break up the empty space.
We're gonna fix that with two things: wall decals and freestanding props. Decals are textures painted onto specific wall segments — posters, signs, graffiti — that add visual variety without touching the map layout. Props are billboarded sprites placed freely in the world — barrels, crates, columns — with collision so the player can't walk through them.
We're building on the base raycaster here. No fog, no monsters — just walls, textures, and movement — so the new stuff stays easy to see.
The Starting Point
Here's the raycaster we're starting from — a 10x10 map with some interior walls, textured rendering with distance shading, a minimap, and arrow-key movement. If you've been through the raycasting tutorial, this should all look familiar.
Here's the map:
const Map = [
    [1, 1, 1, 1, 1, 1, 1, 1, 1, 1],
    [1, 0, 0, 0, 1, 0, 0, 0, 0, 1],
    [1, 0, 0, 0, 1, 0, 0, 0, 0, 1],
    [1, 0, 0, 0, 0, 0, 0, 0, 0, 1],
    [1, 1, 1, 0, 0, 0, 0, 1, 1, 1],
    [1, 0, 0, 0, 0, 0, 0, 0, 0, 1],
    [1, 0, 0, 0, 0, 0, 1, 0, 0, 1],
    [1, 0, 0, 0, 0, 0, 1, 0, 0, 1],
    [1, 0, 0, 0, 0, 0, 0, 0, 0, 1],
    [1, 1, 1, 1, 1, 1, 1, 1, 1, 1],
];
A few corridors and rooms to walk through, but every wall looks the same and there's nothing on the floor. Walk around — it's functional, but lifeless.
const WallTexture = [
    4, 4, 4, 5, 4, 4, 4, 4,
    4, 4, 4, 5, 4, 4, 4, 4,
    5, 5, 5, 5, 5, 5, 5, 5,
    4, 4, 4, 4, 4, 5, 4, 4,
    4, 4, 4, 4, 4, 5, 4, 4,
    5, 5, 5, 5, 5, 5, 5, 5,
    4, 4, 4, 5, 4, 4, 4, 4,
    4, 4, 4, 5, 4, 4, 4, 4,
];

const Constants = {
    MapSize: 10,
    Fov: 0.66,
    MoveSpeed: 0.05,
    RotSpeed: 0.05,
    Cell: 3,
    MmX: 97,
    MmY: 97,
    SpawnX: 1.5,
    SpawnY: 1.5,
};
The rendering loop casts one ray per screen column, steps through the map with DDA until it hits a wall, and draws a textured vertical stripe. Walls on the X axis get an extra darkening pass so you can tell corners apart. The full raycasting code is covered in the original tutorial — we won't go over it again here.

Wall Decals
A decal is a texture overlaid on a specific wall segment. The map doesn't change — we just mark certain wall faces as having extra detail, and swap in the decal pixels during rendering where they aren't transparent.
First, the decal texture. Think of it as a small sign pinned to the wall — an 8x8 poster with a border and a colored center. Transparent pixels (-1) let the wall texture show through around the edges:
const PosterTexture = [
    -1, -1, -1, -1, -1, -1, -1, -1,
    -1,  8,  8,  8,  8,  8,  8, -1,
    -1,  8,  7,  7,  7,  7,  8, -1,
    -1,  8,  7, 10, 10,  7,  8, -1,
    -1,  8,  7, 10, 10,  7,  8, -1,
    -1,  8,  7,  7,  7,  7,  8, -1,
    -1,  8,  8,  8,  8,  8,  8, -1,
    -1, -1, -1, -1, -1, -1, -1, -1,
];
Now we need a way to say "this wall segment has a decal." Each entry in the Decals array identifies a wall by its map grid position (mx, my) and which face was hit (side — 0 for X-axis faces, 1 for Y-axis faces). These are the same values the DDA loop already gives us when it finds a wall:
const Decals = [
    { mx: 4, my: 1, side: 1 },
    { mx: 1, my: 3, side: 0 },
    { mx: 6, my: 6, side: 1 },
];
A helper checks whether a wall hit matches any decal:
function hasDecal(mx, my, side) {
    return Decals.some(
        (d) => d.mx === mx && d.my === my && d.side === side,
    );
}
The rendering change is small. After the DDA loop finds a wall, we call hasDecal(mx, my, side). If it matches, we sample the decal texture at the same texel coordinates we'd use for the wall. Non-transparent decal pixels replace the wall color; transparent ones fall through:
const decal = hasDecal(mx, my, side);

for (let sy = drawStart; sy < drawEnd; sy++) {
    const ty = Math.min(7, Math.floor(texPos));
    texPos += texStep;

    let color = sprites.wall[ty * 8 + tx];
    if (color < 0) continue;

    if (decal) {
        const dc = sprites.poster[ty * 8 + tx];
        if (dc >= 0) color = dc;
    }

    if (perpDist >= 6) {
        color = Darken[Darken[color]];
    } else if (perpDist >= 3) {
        color = Darken[color];
    }

    if (side === 0) {
        color = Darken[color];
    }

    pset(x, sy, color);
}
The decal check happens before distance shading, so posters darken naturally with distance — just like the walls they're on. Walk around and you'll spot three posters on different walls.

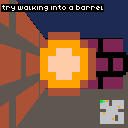
Props & Collision
Decals dress up the walls, but the floors are still empty. Props fix that — they're sprites placed at world coordinates, rendered as billboards that always face the camera. If you went through the monster spawning tutorial, the billboard approach will look familiar. The difference here is that props don't move, and we're adding collision so the player can't walk through them.
Let's start with the prop sprite and placement data. The sprite is an 8x8 barrel, and each prop gets an x and y position in world space:
const PropSprite = [
    -1, -1,  4,  4,  4,  4, -1, -1,
    -1,  4,  9,  9,  9,  9,  4, -1,
     4,  9,  9, 15, 15,  9,  9,  4,
     4,  9, 15, 15, 15, 15,  9,  4,
     4,  9, 15, 15, 15, 15,  9,  4,
     4,  9,  9, 15, 15,  9,  9,  4,
    -1,  4,  9,  9,  9,  9,  4, -1,
    -1, -1,  4,  4,  4,  4, -1, -1,
];

const Props = [
    { x: 3.5, y: 1.5 },
    { x: 7.5, y: 3.5 },
    { x: 2.5, y: 5.5 },
    { x: 5.5, y: 7.5 },
];
Rendering with a z-buffer
To draw props correctly, we need to know which screen columns are already occupied by closer walls. During wall rendering, we store each column's perpendicular distance in a zBuffer array:
const zBuffer = new Array(128);

// inside the wall rendering loop, after computing perpDist:
zBuffer[x] = perpDist;
After all walls are drawn, we sort props by distance from the player (farthest first) and project each one into screen space. The projection uses the camera's inverse determinant to transform world-space offsets into screen coordinates — same math we used for monster billboards:
const sorted = Props.map((p, i) => ({
    i,
    dist: (p.x - px) * (p.x - px) + (p.y - py) * (p.y - py),
})).sort((a, b) => b.dist - a.dist);

const invDet = 1 / (planeX * dirY - dirX * planeY);

for (const { i } of sorted) {
    const p = Props[i];
    const sx = p.x - px;
    const sy = p.y - py;

    const transformX = invDet * (dirY * sx - dirX * sy);
    const transformY = invDet * (-planeY * sx + planeX * sy);

    if (transformY <= 0) continue;

    const screenX = Math.floor((128 / 2) * (1 + transformX / transformY));
    const sprH = Math.floor(128 / transformY);
    const sprW = sprH;

    const drawStartY = Math.max(0, Math.floor(64 - sprH / 2));
    const drawEndY = Math.min(128, Math.floor(64 + sprH / 2));
    const drawStartX = Math.max(0, Math.floor(screenX - sprW / 2));
    const drawEndX = Math.min(128, Math.floor(screenX + sprW / 2));

    for (let stripe = drawStartX; stripe < drawEndX; stripe++) {
        if (transformY >= zBuffer[stripe]) continue;

        const tx = Math.floor(
            ((stripe - (screenX - sprW / 2)) * 8) / sprW,
        );

        for (let y = drawStartY; y < drawEndY; y++) {
            const ty = Math.floor(
                ((y - (64 - sprH / 2)) * 8) / sprH,
            );

            let color = sprites.prop[ty * 8 + tx];
            if (color < 0) continue;

            if (transformY >= 6) {
                color = Darken[Darken[color]];
            } else if (transformY >= 3) {
                color = Darken[color];
            }

            pset(stripe, y, color);
        }
    }
}
The key line is if (transformY >= zBuffer[stripe]) continue — it skips any prop column that's behind a wall, giving us correct occlusion for free.
Collision
Without collision, the player walks straight through props like they aren't there. We can fix that with a simple distance check. Before applying movement, we test whether the new position is within a collision radius of any prop center. X and Y are checked independently so the player slides along props rather than stopping dead:
const CollisionRadius = 0.3;

function collidesWithProp(x, y) {
    return Props.some(
        (p) => Math.abs(p.x - x) < CollisionRadius && Math.abs(p.y - y) < CollisionRadius,
    );
}
We add the collision check to the movement code alongside the existing wall check:
if (btn('ArrowUp')) {
    const nx = px + Math.cos(pa) * Constants.MoveSpeed;
    const ny = py + Math.sin(pa) * Constants.MoveSpeed;
    if (Map[Math.floor(py)][Math.floor(nx)] === 0 && !collidesWithProp(nx, py)) px = nx;
    if (Map[Math.floor(ny)][Math.floor(px)] === 0 && !collidesWithProp(px, ny)) py = ny;
}
Each axis is tested separately — collidesWithProp(nx, py) checks only X, and collidesWithProp(px, ny) checks only Y. That means walking diagonally into a barrel still lets you slide along its edge on the free axis, which feels way better than stopping dead.
The minimap shows prop positions as small orange dots so you can see where they are from above.
Going Further
- Multiple decal and prop types — Store a texture index in each
DecalsandPropsentry so different walls get different posters and different props use different sprites (crates, columns, barrels). - Animated decals — Cycle through multiple textures on a timer for flickering signs or blinking lights on walls.
- Destructible props — Track prop health and remove them from the
Propsarray when they take enough damage. The collision check and rendering loop skip removed entries automatically. - Map-driven placement — Use special map values (2 for a prop, 3 for a decal) instead of separate arrays, so you can place decorations directly in the map grid.
- Transparency and alpha blending — Instead of a binary transparent/opaque check, blend decal colors with wall colors for semi-transparent effects like stained glass or faded graffiti.