How to Add Scene & Level Management to a Raycaster
Every raycaster tutorial so far has used a single map — one grid, one texture, one space to explore. That's fine for learning the renderer, but games have levels. A dungeon crawler needs corridors that lead somewhere. A horror game needs rooms that get worse.
We're going to add level management to our raycaster. We'll bundle level data into self-contained objects, load different maps at runtime, scatter collectible keys around as a win condition, fade to black between levels, and wire up a title screen with a full game loop. By the end, we'll have a three-level dungeon crawl with distinct maps, textures, and progression.
This builds on the raycasting tutorial. If you're after the general scene management pattern — scene registries, level-select grids, progress tracking — the scene management tutorial covers that. Here we're focused on raycaster-specific stuff: swapping maps and textures, rendering collectible billboard sprites, and making transitions feel right in first-person.
The Starting Point
This builds on the raycasting tutorial. If you haven't worked through that one, start there — we're assuming you're comfortable with the DDA algorithm, textured walls, and the minimap.
Here's our starting raycaster. It's the same code from the raycasting tutorial, with one structural change: the map, wall texture, and spawn position live in a level object instead of loose variables:
const level = {
    name: 'THE CORRIDOR',
    map: [
        [1,1,1,1,1,1,1,1],
        [1,0,0,0,0,0,0,1],
        [1,0,1,0,0,1,0,1],
        [1,0,0,0,0,0,0,1],
        [1,0,0,0,0,0,0,1],
        [1,0,1,0,0,1,0,1],
        [1,0,0,0,0,0,0,1],
        [1,1,1,1,1,1,1,1],
    ],
    wallTexture: [
        6, 6, 6, 6, 6, 6, 6, 6,
        6,13,13, 6, 6,13,13, 6,
        6,13,13, 6, 6,13,13, 6,
        6, 6, 6, 6, 6, 6, 6, 6,
        6, 6, 6, 6, 6, 6, 6, 6,
        6,13, 6,13,13, 6,13, 6,
        6,13,13,13,13,13,13, 6,
        6, 6, 6, 6, 6, 6, 6, 6,
    ],
    spawnX: 1.5,
    spawnY: 1.5,
};
The map is the same 8×8 grid — 1 for walls, 0 for open space. wallTexture is an 8×8 pixel art sprite as a flat array of palette indices. spawnX/spawnY tell the engine where to place the player when the level loads.
Nothing about the raycaster itself changes. We're just bundling related data so that later, when we have multiple levels, we can swap everything at once by switching to a different level object.
The rest of the code is unchanged — DDA raycasting, textured wall rendering with distance shading, and a minimap in the corner:
const map = level.map;
const wallTexture = level.wallTexture;
const sprites = { wall: wallTexture };

let px = level.spawnX;
let py = level.spawnY;
let pa = 0;

const Constants = {
    Fov: 0.66,
    MoveSpeed: 0.05,
    RotSpeed: 0.05,
    MapSize: 8,
    Cell: 4,
    MmX: 96,
    MmY: 96,
};

const Darken = [
    0, 0, 0, 0, 2, 0, 5, 6,
    2, 4, 9, 3, 1, 1, 2, 9,
];
We pull map and wallTexture out of the level object into local variables so the raycasting loop doesn't need any changes. Constants groups the tuning values — field of view, movement speeds, minimap layout — in one place. Darken shifts each palette color one shade darker for distance shading and side-face shading.
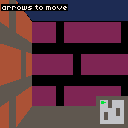
Use the arrow keys to walk around. This is the corridor — narrow passages with a brick wall texture. Next, we'll add two more maps and a way to switch between them.
Multiple Maps
One level object is nice, but the whole point is having multiple levels. Let's define three maps with different layouts and wall textures, then add a function to load any of them by index.
First, the three maps. Each is an 8×8 grid, same format as before:
const Maps = [
    [
        [1,1,1,1,1,1,1,1],
        [1,0,0,1,0,0,0,1],
        [1,0,0,1,0,0,0,1],
        [1,0,0,0,0,1,0,1],
        [1,0,1,0,0,1,0,1],
        [1,0,1,0,0,0,0,1],
        [1,0,0,0,0,0,0,1],
        [1,1,1,1,1,1,1,1],
    ],
    [
        [1,1,1,1,1,1,1,1],
        [1,0,0,0,0,0,0,1],
        [1,0,0,0,0,0,0,1],
        [1,0,0,1,1,0,0,1],
        [1,0,0,1,1,0,0,1],
        [1,0,0,0,0,0,0,1],
        [1,0,0,0,0,0,0,1],
        [1,1,1,1,1,1,1,1],
    ],
    [
        [1,1,1,1,1,1,1,1],
        [1,0,1,0,0,0,1,1],
        [1,0,1,0,1,0,0,1],
        [1,0,0,0,1,1,0,1],
        [1,1,1,0,0,0,0,1],
        [1,0,0,0,1,0,1,1],
        [1,0,1,0,0,0,0,1],
        [1,1,1,1,1,1,1,1],
    ],
];
The Corridor (map 0) has narrow passages with internal walls creating an L-shaped route. The Courtyard (map 1) is wide open with a pillar block in the center. The Maze (map 2) is dense and winding — lots of dead ends.
Each map gets its own wall texture so the difference is obvious when you switch:
const WallTextures = [
    [
        4, 4, 4, 5, 4, 4, 4, 4,
        4, 4, 4, 5, 4, 4, 4, 4,
        5, 5, 5, 5, 5, 5, 5, 5,
        4, 4, 4, 4, 4, 5, 4, 4,
        4, 4, 4, 4, 4, 5, 4, 4,
        5, 5, 5, 5, 5, 5, 5, 5,
        4, 4, 4, 5, 4, 4, 4, 4,
        4, 4, 4, 5, 4, 4, 4, 4,
    ],
    [
        6, 6,13, 6, 6,13, 6, 6,
        6, 6,13, 6, 6,13, 6, 6,
        13,13,13,13,13,13,13,13,
        6, 6, 6, 6,13, 6, 6, 6,
        6, 6, 6, 6,13, 6, 6, 6,
        13,13,13,13,13,13,13,13,
        6, 6,13, 6, 6,13, 6, 6,
        6, 6,13, 6, 6,13, 6, 6,
    ],
    [
        4, 9, 4, 9, 4, 9, 4, 9,
        9, 4, 9, 4, 9, 4, 9, 4,
        4, 9, 4, 9, 4, 9, 4, 9,
        9, 4, 9, 4, 9, 4, 9, 4,
        4, 9, 4, 9, 4, 9, 4, 9,
        9, 4, 9, 4, 9, 4, 9, 4,
        4, 9, 4, 9, 4, 9, 4, 9,
        9, 4, 9, 4, 9, 4, 9, 4,
    ],
];
Texture 0 is a brown brick pattern (palette colors 4 and 5). Texture 1 is grey stone blocks (6 and 13). Texture 2 is a checkerboard (4 and 9). Even at 8×8 pixels, these read as different materials once the raycaster stretches them across the walls.
Now let's bundle everything into a Levels array:
const Levels = [
    {
        name: 'THE CORRIDOR',
        map: Maps[0],
        wallTexture: WallTextures[0],
        spawnX: 1.5,
        spawnY: 1.5,
    },
    {
        name: 'THE COURTYARD',
        map: Maps[1],
        wallTexture: WallTextures[1],
        spawnX: 1.5,
        spawnY: 1.5,
    },
    {
        name: 'THE MAZE',
        map: Maps[2],
        wallTexture: WallTextures[2],
        spawnX: 1.5,
        spawnY: 1.5,
    },
];
Each level has a name (for the HUD), a map, a wallTexture, and a spawn position. Adding a new level later is just another object in this array.
The key addition is loadLevel — a function that swaps everything at once:
let currentLevel = 0;
let map, wallTexture, px, py, pa;

function loadLevel(index) {
    currentLevel = index;
    const level = Levels[currentLevel];
    map = level.map;
    wallTexture = level.wallTexture;
    px = level.spawnX;
    py = level.spawnY;
    pa = 0;
}

loadLevel(0);

const sprites = { wall: Levels[0].wallTexture };
Instead of declaring map, wallTexture, px, py, and pa with initial values, we declare them empty and let loadLevel fill them in. The sprites object needs updating when the wall texture changes too — we'll handle that in the update loop.
To test, we use btnp('z') to cycle through levels:
function update() {
    if (btnp('z')) {
        loadLevel((currentLevel + 1) % Levels.length);
        sprites.wall = wallTexture;
    }

    // ... movement code unchanged
}
Pressing Z advances to the next level (wrapping back to 0 after the last one) and swaps the wall texture in sprites. The raycasting loop doesn't need any changes — it already reads from map and sprites.wall, which now point to the new level's data.
We also show the level name on screen:
text(Levels[currentLevel].name, 2, 2, 7);
text('z = next level', 2, 10, 6);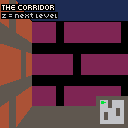
Press Z to switch between The Corridor, The Courtyard, and The Maze. The walls, layout, and your position all change instantly. In a real game you wouldn't have a "next level" button — the player would earn the transition by completing an objective. That's what we'll build next.
Collectible Keys
Pressing Z to switch levels works for testing, but players need a reason to move to the next map. Let's scatter collectible keys around each level — collect them all and an exit portal appears. Walk into it and the next level loads.
First, we extend each level object with key positions and an exit location:
const Levels = [
    {
        name: 'THE CORRIDOR',
        map: Maps[0],
        wallTexture: WallTextures[0],
        spawnX: 1.5,
        spawnY: 1.5,
        keys: [{ x: 5.5, y: 1.5 }, { x: 1.5, y: 5.5 }],
        exitX: 6.5,
        exitY: 6.5,
    },
    {
        name: 'THE COURTYARD',
        map: Maps[1],
        wallTexture: WallTextures[1],
        spawnX: 1.5,
        spawnY: 1.5,
        keys: [{ x: 6.5, y: 1.5 }, { x: 1.5, y: 6.5 }, { x: 6.5, y: 6.5 }],
        exitX: 6.5,
        exitY: 3.5,
    },
    {
        name: 'THE MAZE',
        map: Maps[2],
        wallTexture: WallTextures[2],
        spawnX: 1.5,
        spawnY: 1.5,
        keys: [{ x: 3.5, y: 1.5 }, { x: 6.5, y: 6.5 }],
        exitX: 6.5,
        exitY: 2.5,
    },
];
Each keys array holds world-space positions where key items spawn. The .5 offset centers them in their map cell. The corridor has 2 keys, the courtyard has 3, the maze has 2. exitX/exitY mark where the exit portal appears once all keys are collected.
Let's update loadLevel to set up key tracking:
let keys, exitX, exitY, exitOpen;

function loadLevel(index) {
    currentLevel = index;
    const level = Levels[currentLevel];
    map = level.map;
    wallTexture = level.wallTexture;
    px = level.spawnX;
    py = level.spawnY;
    pa = 0;
    keys = level.keys.map(k => ({ x: k.x, y: k.y, collected: false }));
    exitX = level.exitX;
    exitY = level.exitY;
    exitOpen = false;
}
We copy the key positions into new objects with a collected flag so we can track pickups without mutating the level data. The exit starts closed.
We need two 8×8 sprites — a key and an exit portal:
const KeySprite = [
    -1, -1, -1, 10, 10, -1, -1, -1,
    -1, -1, 10, 10, 10, 10, -1, -1,
    -1, 10, 10, 11, 11, 10, 10, -1,
    10, 10, 11, 11, 11, 11, 10, 10,
    10, 10, 11, 11, 11, 11, 10, 10,
    -1, 10, 10, 11, 11, 10, 10, -1,
    -1, -1, 10, 10, 10, 10, -1, -1,
    -1, -1, -1, 10, 10, -1, -1, -1,
];

const ExitSprite = [
    -1, -1, 11, 11, 11, 11, -1, -1,
    -1, 11,  3,  3,  3,  3, 11, -1,
    11,  3,  3, 11, 11,  3,  3, 11,
    11,  3, 11, 11, 11, 11,  3, 11,
    11,  3, 11, 11, 11, 11,  3, 11,
    11,  3,  3, 11, 11,  3,  3, 11,
    -1, 11,  3,  3,  3,  3, 11, -1,
    -1, -1, 11, 11, 11, 11, -1, -1,
];

const sprites = { wall: wallTexture, key: KeySprite, exit: ExitSprite };
The key is a green diamond (palette colors 10 and 11). The exit is a blue-green portal ring. Pixels set to -1 are transparent — the raycaster skips them so the wall or floor behind shows through.
Pickup detection happens in update. We check the distance from the player to each uncollected key:
for (const k of keys) {
    if (k.collected) continue;
    const dx = px - k.x;
    const dy = py - k.y;
    if (Math.sqrt(dx * dx + dy * dy) < 0.5) {
        k.collected = true;
    }
}

const remaining = keys.filter(k => !k.collected).length;
if (remaining === 0) exitOpen = true;
When the player gets within 0.5 units of a key, it's collected. Once none remain, exitOpen flips to true and the exit becomes active. The same proximity check on the exit loads the next level:
if (exitOpen) {
    const dx = px - exitX;
    const dy = py - exitY;
    if (Math.sqrt(dx * dx + dy * dy) < 0.5) {
        const next = (currentLevel + 1) % Levels.length;
        loadLevel(next);
        sprites.wall = wallTexture;
    }
}
To render keys and the exit in the 3D view, we need billboard sprites — 2D images that always face the camera. This is the same technique from the monster spawning tutorial, but simpler — no AI, just static positions.
drawBillboard transforms a world-space position into screen coordinates using the inverse camera matrix:
function drawBillboard(spriteData, worldX, worldY,
    dirX, dirY, planeX, planeY, zBuffer) {
    const sx = worldX - px;
    const sy = worldY - py;
    const invDet = 1 / (planeX * dirY - dirX * planeY);
    const transformX = invDet * (dirY * sx - dirX * sy);
    const transformY = invDet * (-planeY * sx + planeX * sy);

    if (transformY <= 0) return;

    const screenX = Math.floor(
        (128 / 2) * (1 + transformX / transformY),
    );
    const sprH = Math.floor(64 / transformY);
    const sprW = sprH;

    const drawStartY = Math.max(
        0, Math.floor(64 + 64 / transformY / 2 - sprH),
    );
    const drawEndY = Math.min(
        128, Math.floor(64 + 64 / transformY / 2),
    );
    const drawStartX = Math.max(
        0, Math.floor(screenX - sprW / 2),
    );
    const drawEndX = Math.min(
        128, Math.floor(screenX + sprW / 2),
    );

    for (let stripe = drawStartX; stripe < drawEndX; stripe++) {
        if (transformY >= zBuffer[stripe]) continue;

        const tx = Math.floor(
            ((stripe - (screenX - sprW / 2)) * 8) / sprW,
        );

        for (let y = drawStartY; y < drawEndY; y++) {
            const ty = Math.floor(
                ((y - (drawStartY + sprH
                    - (drawEndY - drawStartY))) * 8) / sprH,
            );
            if (ty < 0 || ty > 7) continue;

            let color = spriteData[ty * 8 + tx];
            if (color < 0) continue;

            if (transformY >= 6) {
                color = Darken[Darken[color]];
            } else if (transformY >= 3) {
                color = Darken[color];
            }

            pset(stripe, y, color);
        }
    }
}
The key value here is transformY — the depth that tells us how far the sprite is from the camera. We compare it against the zBuffer (filled during wall rendering) so sprites behind walls stay hidden. The sprite uses the same distance shading as walls too, so keys darken as they recede into the distance.
The drawStartY calculation positions the sprite on the floor rather than centered at eye level. Using 64 + 64/transformY/2 - sprH instead of the usual 64 - sprH/2 shifts it down to sit on the ground plane.
After the wall raycasting loop, we gather all visible billboards, sort them back-to-front, and draw:
const billboards = [];
for (const k of keys) {
    if (!k.collected) {
        billboards.push({ sprite: sprites.key, x: k.x, y: k.y });
    }
}
if (exitOpen) {
    billboards.push({ sprite: sprites.exit, x: exitX, y: exitY });
}

billboards
    .map(b => ({
        b,
        dist: (b.x - px) * (b.x - px)
            + (b.y - py) * (b.y - py),
    }))
    .sort((a, b) => b.dist - a.dist)
    .forEach(({ b }) =>
        drawBillboard(
            b.sprite, b.x, b.y,
            dirX, dirY, planeX, planeY, zBuffer,
        ),
    );
Sorting back-to-front means distant sprites render first and closer ones paint over them — the painter's algorithm. Without this sort, a far key could overdraw a near one.
Keys and the exit also show up on the minimap as colored pixels:
for (const k of keys) {
if (k.collected) continue;
pset(
Constants.MmX + Math.floor(k.x * Constants.Cell),
Constants.MmY + Math.floor(k.y * Constants.Cell),
10,
);
}
if (exitOpen) {
pset(
Constants.MmX + Math.floor(exitX * Constants.Cell),
Constants.MmY + Math.floor(exitY * Constants.Cell),
11,
);
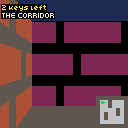
}Green dots for keys, a bright dot for the exit. The HUD shows how many keys are left:
const remaining = keys.filter(k => !k.collected).length;
if (remaining > 0) {
    text(remaining + ' keys left', 2, 2, 10);
} else {
    text('find the exit!', 2, 2, 11);
}
text(Levels[currentLevel].name, 2, 10, 7);
Walk into the green diamonds to collect them. The HUD shows how many are left. Once they're all gone, a portal appears — walk into it to load the next level. Right now the transition is instant, which feels a bit abrupt. Let's fix that next.
Scene Transitions
Jumping straight from one level to the next feels jarring — one frame you're in a brick corridor, the next you're in a stone courtyard with no warning. A short fade-to-black bridges the gap and gives the player a moment to reset.
The transition has two phases: closing (black bars slide in from top and bottom until they meet in the middle) and opening (the bars slide back out to reveal the new level). The level swap happens at the midpoint when the screen is fully black.
Let's add some state to track it:
let transitioning = false;
let transPhase = 0;
let transProgress = 0;
let transTarget = 0;
const TransSpeed = 4;

let victory = false;
transPhase is 0 for closing, 1 for opening. transProgress tracks how many pixels the black bars have moved (0 to 64, since each bar covers half the 128-pixel screen). TransSpeed controls the speed — 4 pixels per frame means the full transition takes about 32 frames. victory fires when the player completes the final level.
A helper kicks off the transition:
function startTransition(nextLevel) {
    if (transitioning) return;
    transitioning = true;
    transPhase = 0;
    transProgress = 0;
    transTarget = nextLevel;
}
We replace the instant level load from the previous section with this:
if (exitOpen) {
    const dx = px - exitX;
    const dy = py - exitY;
    if (Math.sqrt(dx * dx + dy * dy) < 0.5) {
        startTransition(currentLevel + 1);
    }
}
Instead of calling loadLevel directly, we start a transition with the next level index as the target.
The transition logic goes at the top of update and returns early to block input while animating:
function update() {
    if (transitioning) {
        if (transPhase === 0) {
            transProgress += TransSpeed;
            if (transProgress >= 64) {
                transProgress = 64;
                if (transTarget >= Levels.length) {
                    victory = true;
                    transitioning = false;
                } else {
                    loadLevel(transTarget);
                    sprites.wall = wallTexture;
                    transPhase = 1;
                }
            }
        } else {
            transProgress -= TransSpeed;
            if (transProgress <= 0) {
                transProgress = 0;
                transitioning = false;
            }
        }
        return;
    }

    if (victory) return;

    // ... movement and key collection unchanged
}
Phase 0 grows transProgress until the bars meet at 64 pixels. At that point, if the target level is past the last one, we set the victory flag. Otherwise we load the new level and flip to phase 1, which shrinks the bars back to zero.
That return at the end of the transition block is important — it prevents the player from moving or collecting keys while the screen is fading.
Drawing the transition is two black rectangles, painted after the game scene so they overlay everything:
if (transitioning) {
    rectfill(0, 0, 128, transProgress, 0);
    rectfill(0, 128 - transProgress, 128, 128, 0);
}
The first rectangle grows down from the top (y = 0 to y = transProgress). The second grows up from the bottom (y = 128 − transProgress to y = 128). They meet at y = 64 when transProgress hits 64.
The victory screen is simple — clear and show a message:
if (victory) {
    text('ALL LEVELS COMPLETE!', 14, 56, 11);
    return;
}
This goes at the top of draw, before any game rendering.
Collect the keys and reach the exit. Black bars close in, the level swaps, and they open to reveal the new map. Complete all three levels and you'll see the victory message. Much better than an instant cut.
Title Screen & Game Flow
Right now the game dumps you straight into level 1. A proper game needs a title screen, a loop through all levels, a victory screen, and a way to restart. Let's add a gameState variable to control which screen is active:
let gameState = 'title';Three states: 'title', 'playing', and 'victory'. The update loop checks the state and routes input:
if (gameState === 'title') {
    if (btnp('z')) {
        startTransition('start');
    }
    return;
}

if (gameState === 'victory') {
    if (btnp('z')) {
        gameState = 'title';
    }
    return;
}
On the title screen, pressing Z triggers a transition to 'start' — a special target that means "load level 0 and begin playing." On the victory screen, Z goes back to the title instantly (no transition needed — it's just a text screen).
The transition system needs to handle these new targets. Previously transTarget was always a level index. Now it can be a level index, 'victory', or 'start':
function startTransition(target) {
    if (transitioning) return;
    transitioning = true;
    transPhase = 0;
    transProgress = 0;
    transTarget = target;
}
The midpoint logic branches on the target type:
if (transPhase === 0) {
    transProgress += TransSpeed;
    if (transProgress >= 64) {
        transProgress = 64;
        if (transTarget === 'victory') {
            gameState = 'victory';
            transitioning = false;
        } else if (transTarget === 'start') {
            loadLevel(0);
            gameState = 'playing';
            transPhase = 1;
        } else {
            loadLevel(transTarget);
            transPhase = 1;
        }
    }
}
When the target is 'victory', the screen stays black and we switch to the victory state — no opening phase. When it's 'start', we load level 0 and open the curtain onto the game. For numeric targets, it works exactly as before.
The exit check now uses 'victory' instead of checking against Levels.length:
if (exitOpen) {
    const dx = px - exitX;
    const dy = py - exitY;
    if (Math.sqrt(dx * dx + dy * dy) < 0.5) {
        if (currentLevel + 1 >= Levels.length) {
            startTransition('victory');
        } else {
            startTransition(currentLevel + 1);
        }
    }
}
We also move sprites.wall = wallTexture into loadLevel itself so callers don't need to remember it:
function loadLevel(index) {
    currentLevel = index;
    const level = Levels[currentLevel];
    map = level.map;
    wallTexture = level.wallTexture;
    px = level.spawnX;
    py = level.spawnY;
    pa = 0;
    keys = level.keys.map(k => ({ x: k.x, y: k.y, collected: false }));
    exitX = level.exitX;
    exitY = level.exitY;
    exitOpen = false;
    sprites.wall = wallTexture;
}
The draw function routes to the right screen based on gameState:
function draw() {
    cls(0);

    if (gameState === 'title') {
        text('DUNGEON CRAWL', 20, 40, 7);
        text('PRESS Z TO START', 12, 56, 6);
    } else if (gameState === 'victory') {
        text('ALL LEVELS COMPLETE!', 4, 40, 11);
        text('PRESS Z FOR TITLE', 8, 56, 6);
    } else {
        drawGame();
    }

    if (transitioning) {
        rectfill(0, 0, 128, transProgress, 0);
        rectfill(0, 128 - transProgress, 128, 128, 0);
    }
}
The transition overlay draws last, regardless of which screen is active. That means the fade-to-black works on all transitions — title to game, level to level, game to victory.
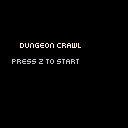
Press Z on the title screen to start. Play through all three levels — collect the keys, reach the exits — and you'll hit the victory screen. Press Z again to go back to the title. That's a complete game loop: title → play → victory → title.
Going Further
We've got a raycaster with multiple levels, collectible objectives, smooth transitions, and a full game loop. Here are some ways to take it further.
Level-select screen. The scene management tutorial builds a grid-based level selector with unlock tracking. The same approach works here — show thumbnails or names for each level, lock unbeaten ones, and let the player replay completed levels.
Save and load progress. The save and load tutorial covers persisting game state to localStorage. Save the highest completed level so progress survives a page refresh. Load it on startup to unlock levels the player has already beaten.
Per-level music or ambient sounds. Add a music or ambience field to each level object. Start it when the level loads, fade it out during the transition, and start the new track when the next level fades in.
Star ratings. Track the time spent on each level. Award 1–3 stars based on completion speed. Show the ratings on the victory screen and save them alongside progress.
Procedural level generation. Replace the hand-authored maps with a maze generator — recursive backtracker, Prim's algorithm, whatever you like. Generate a new layout each time the player enters a level for endless replayability.
Difficulty scaling. Add more keys on later levels, use larger maps, or place keys in harder-to-reach spots. You could also introduce locked doors that require specific colored keys, adding a puzzle element to the navigation.